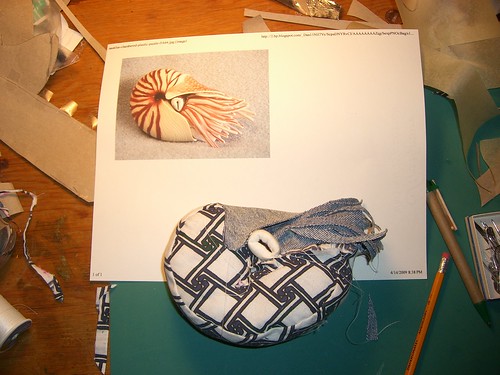
Prototype nautilus


Prototype nautilus, originally uploaded by jfeathersmith.

About 3 hours of work to get to this point. I sewed my finger to it once, and then almost did a second time (hand sewing, and the needle/thread only passed through the uppermost layer of skin, but it felt rather weird).

First time posting using Flickr’s “blog this” option; let’s see how it works.

ETA: Hmm, well that’s rather convenient for posts containing just one picture. Except I still have to add tags via Blogger’s editor.

Share
Posted in Uncategorized | Tagged

It’s interesting, but what is it good for?


This project was actually completed a few years ago, as the final project in my Experimental Drawing class. I combined techniques from our puzzle project and our juxaposition project, primarily because I wanted to see how easy it would be to make a tessellating pattern that could also interlock in 3D. (The image above is actually of some of the test pieces, not the final set, but you get the idea.)

I was also interested in exploring what would happen when I scrambled an image (traced onto the acrylic pieces), overlaid some bits of it with other bits, and then linked sets of pieces together to form partial cubes. Since all the pieces are the same shape, the partial cubes can be stacked, made into rows, etc., so you get some depth to the recombined image.

It wasn’t as successful as I had hoped (not that I really had any clear idea what it would be like), and I’ve often wished I still had access to a laser cutter, so that I could do more experimenting. I think it would be much more interesting if I had used much thicker lines on the acrylic, and chosen a pattern that would align better, so that the lines from the original image could link up with other lines that came from a different part of the image, creating an interesting new, fragmented/reassembled picture. It would certainly be easier with a pattern, rather than a picture.

If the pieces were larger – 12 inches on a side, or 2 feet – I could see them being used for shelving or end tables, although I’d want to make them from wood (probably), and work out a good way to keep the pieces together, because they slide apart /really/ easily, and that’s a Bad Thing for furniture. (I could just cut the slots slightly smaller, but then they might bind, especially if they were wood.)

Share

Because Easter has the best candy

I figured I could justify buying some for myself if I also bought some for other people. And then I thought it would be more fun to actually make up little Easter baskets to put it in. But of course I didn’t want to buy some small, cheap basket that wouldn’t be worth the dollar-fifty, so I had to come up with another solution.

I could fold basket shapes out of newspaper.

Or . . . I could make use of the empty kleenex boxes that are almost always around (the household goes through a LOT of kleenex. Sorry – Kleenex).

Oh! And I could cut the edges down into grass shapes! And trim around the flowers printed on the sides!

So I did, and apparently they were a hit. One of the recipients encouraged me – repeatedly; one could say he egged me on, if one were inclined to make that sort of pun, which I am not, you’re welcome – to write it up as an Instructable, no really, he thought it was quite clever, and it could be just one photo and a couple lines of text, how quick and easy would that be!

Well. See for yourself.


Make an Easter basket from materials found in the recycle binMore DIY How To Projects

I am actually quite pleased with them myself, but it -is- more than one step! My only regret? That I didn’t buy more chocolate eggs. But by some strange coincidence, tomorrow is the day after Easter, so there should be some good sales. And since I’ve been planning to hit post-Easter sales for cheap moving toys (glee! I can make Porkchop a friend!), well, I might as well take a minor side trip to the candy aisle.

Share