A bunch of links about tools

Lindstrom’s home page. They make a variety of high-end pliers and cutters, and have info online about their products.

Swanstrom’s home page. They also make a variety of high-end pliers and cutters, and have somewhat less helpful info about their products (organization of some of it leaves much to be desired.)

JewelryMakingGuide.com: article about super-flush cutters.

artjewelrymag Forum discussion about flush cutters.

From JewelryLessons.com: q&a about pliers.

Jewelry Pliers and Wire Wrapping Supplies: Basic Tools You Need…And Don’t Need – a useful list!

Another list of tools and resources.

Choosing the right pliers for the job.

Description of mandrel-tip pliers.

Advice about buying beads online.

Share

Saving the kitchen sink from boggy horror, part 1

Historically, this has been the way sponges and scrubbing things have been stored on the kitchen sink:

Sponges and scrubbers at the kitchen sink

IMPERILED! Sponges rest on the sink edge; scrubbers sit in a dish

The dish has no drainage. It gets quite disgusting as water drips off the brushes. And anything sitting all the way in the bottom of the dish also gets quite disgusting.

So I started thinking about trying to find some kind of metal or plastic mesh that could be fitted inside the dish, raised up slightly, so that the cleaning objects could sit on the mesh, ABOVE the disgusting soapy water muck mix that accumulates. The back of the sink would also need something so the sponges would actually have a chance to dry out.

Early sketches of the brush-saving device

Early sketches of the brush-saving device

First I thought about making it all one piece that would loop up from the sink over the edge of the dish and down into the dish.

Then I thought it made more sense to make 2 pieces, so they could be removed and cleaned individually; the mesh for the sponges still needs some kind of hook on it to hold it to the dish so it doesn’t get knocked into the sink.

I also thought that maybe some kind of Y-shaped support could be inserted into the dish to hold the brush handles up; right now, they tend to fall onto the sponges. Making hooks to hang from the windowsill above the sink is another idea.

So far, I have made the mesh to sit inside the dish:

Half of the dish mesh, on a jig made with small nails and scrap wood

Half of the dish mesh, on a jig made with small nails and scrap wood

The mesh woven together, with the jig set up for the 2nd piece

The mesh woven together, with the jig set up for the 2nd piece. The feet still need to be formed from the ends of the wires, and it needs some minor bending to flatten it out.

Finished mesh

Finished, feet and all.

Mesh in dish

Mesh in dish. I had to bend a couple of the loops of wire a bit to get it to fit; apparently the jig (or my bending technique) was not quite precise enough.

Scrubbers resting on the mesh

Hooray! The scrubbers are saved from the Bog of Doom!

I used stainless steel wire, which was a disappointing matte grey, not the shiny highly polished stainless steel that I am used to seeing in the silverware drawer. However, with all the bending and manipulating of the metal with metal pliers (and rubbing against the wire nails, it was a lot shinier by the time I finished. (So if when I make jewelry with this stuff, I shall see about polishing it to make it shiny.)

The weaving process took the most time, because as soon as I’d push the wire just over the other piece of mesh, it wanted to slip off. And weaving in the very last length of wire was pretty difficult. Wire: not as flexible as string or yarn! Shocking!

I’m thinking now that pieces of woven wire might be interesting foundational structures to support beads and other, more complicated shapes, perhaps for bracelets (not that I wear bracelets) or necklaces or . . . things. And brass (or copper) would be a lot easier to manipulate. Perhaps instead of a straight, rectangular mesh, I could set up a jig to create more angular shapes, something more V-shaped. (I can see it in my head, but I haven’t sketched it out. Yet.)

Time to make:

  • One washing machine cycle (somewhere between 30 minutes and an hour). I know this because I started my laundry and then started the jig and bending, down in the basement where I could easily hear the machine going through its process. (I did the sketching on a previous day. But it didn’t take very long.)

Materials:

  • Stainless steel wire from the local Tags.
  • Wire nails (for the jig)
  • Scrap wood (for the jig)

Tools:

  • Hammer
  • Small needle-nose pliers (to hold the wire nails while I hammered them in; this saved me many smashed fingers. Also used sometimes to bend the wire, though I used my hands a lot, too)
  • Diagonal wire cutters

Now to save the sponges.

Share

Some things in progress and ear terminology

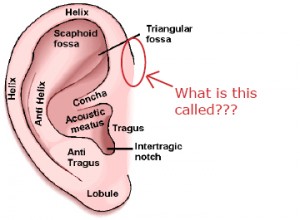
I have been playing with a variety of shapes for ear cuffs, both large cuffs for the entire ear and smaller pieces. I’ve started to get really interested in cuffs that hook over the top front part of the ear, which apparently doesn’t have a special name. It’s like the lobe, only the upper part. You know, the top part of where your ear attaches to your head? That spot.

Diagram of the external parts of an ear

An almost-helpful diagram of a human ear. Source of original ear image.

Anyway.

I’d like to know how to best describe that spot because some of the larger ear cuffs have a hook that curves around that spot. (Some fit only over that spot, and are small; some fit over that spot plus one or two other places around the helix because they are rather larger.)

ETA (July 30): I got email from a reader earlier this week with the answer! It is called the “forward pinna” or “forward helix.” Thank you!

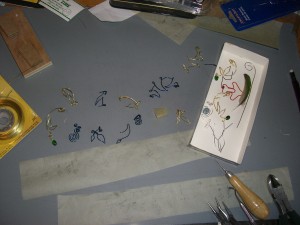
Here’s what my desk looks like at the moment. More or less. I rearranged a few things to fit them into the shot better.

Some experimental ear cuffs. Also: trace paper diagrams that help me recreate certain shapes. Also: a feather I experimented with to see how wire wrapping a feather would go. Click on the photo for a MUCH LARGER version.

I’m feeling a bit overwhelmed with different ideas, and the desire to go try them out tends to get priority over perfecting any idea. And of course once I get one to a point that looks good, then I have more ideas to build on that idea. It’s fun, but it’s a little frustrating, too, because I can only do one thing at once!

Share

The world’s ugliest lightbox

I’m not a very proficient photographer, and I don’t have a lot of patience for fiddling with the various settings on my camera to get perfect results, so when I saw some easy instructions for how to build your own lightbox, I made a mental note of it. I figured someday it might be a useful thing to know how to do, if I had small objects I wanted to make some effort to photograph nicely. I know I can always adjust things in Photoshop later, but I’d rather not have to add that step to the process.

Since I started making more jewelry, I’ve become even more bothered by the crappy pictures I’ve been getting under inferior artificial light, so a week or so ago, I looked up the “How to build a lightbox” instructions, and built my own last night.

Here is one such tutorial via Strobist.

Here is another using fabric instead of trace or tissue paper.

Google provides a variety of other alternatives; I saw another one built out of foam core, with solid walls; illumination is provided by clamping lights to the front walls and aiming them into the box (instead of lighting the exterior, and diffusing the light with trace paper or fabric).

Here’s my version:

Lightbox built from binder clips and used Priority Mail boxes

One clip-on lamp + one ugly old saved-from-a-basement lamp = my light sources.

It’s made from two Priority Mail boxes, with trace paper covering the cut-outs in the sides and top. I use binder clips to hold the two pieces together. I cut the top so I can lift a flap of paper out of the way and take photos from above my subject; it is generally held (mostly) in place with tape.

Yeah, it’s ugly, and it probably took longer to make than if I’d started with a single box of the right size. And there are gaps where there technically shouldn’t be. BUT it can be taken apart and stored flat, so it takes up very little space!

Here are some pictures I took to test it all out:

Testing white balance

Not too shabby.

Another white balance test

Also not bad. If only I'd made notes about what the camera settings were.

Overhead picture

I cut a hole in the trace paper on the box top so I could take overhead pictures.

Flash!

Flash! A bit too yellow.

One of my current light sources is a fluorescent bulb, which is not really as bright as I’d like; this will be an easy fix (in fact now that I think about it, I think I might have a nice incandescent stored in a large yogurt container on the little table next to the window). Usually I only use that light, clipped to a bookcase, to provide additional light when I need to use my big mirror. It turns out the clip part of it balances very well when placed on the desk, so the lamp can be a desk lamp without needing to be clipped to the edge of the desk! Nice design, that.

I do want to get a large sheet of white paper to cover the back and create the bottom of the light box; the cutting mat and brown cardboard are not particularly nice.

I originally thought about making a teeny tiny lightbox out of a kleenex box, but it’s easier to put different backdrops and props into the bigger box. (I may make a tiny one anyway, because it would be fun and cute.)

Share

Pondering colors and seasons

Ignoring all the wires that have some sort of enamel coating to give them color (and also ignoring fancy metals like niobium and titanium, which can be turned pretty colors through exciting electrical processes), metal wire doesn’t come in very many different colors. Really only 3 dramatically different colors (reddish yellow being awfully close to either yellow – brass – or copper – rose gold).

There’s silver: silver, steel (stainless or galvanized), aluminum

There’s yellow: brass, gold, bronze

There’s reddish yellow: brass (sometimes), gold

There’s reddish brown: copper

I’ve been thinking about colors evocative of the seasons, and winter is easy: silver, accented with blue, grey, white, silver, mauve. Maybe some other very pale pinks and blues and purples: I see those in the cloudy winter sky.

Fall is also super easy: copper or yellow metal, accented with red, yellow, orange, brown. Maybe a little purple. (Why purple? I don’t know. It just seems right.) Maybe some dark green.

Spring is a little tricky, actually. Should it be silver accented with green? (And/or some early spring blossom colors, which tend to yellows and purples and blues, though of course tulips are any color you want.) Or yellow accented with green? Then what happens with summer? Because summer is where I get really stuck. Maybe summer should be yellow with green. But there are lots of different colors of flowers in the summer. So I don’t know. Light green for spring, dark green for summer?

Share

Weekend summary: pigeon bead necklace done and other things in progress

Helpful hint: Misplacing your prototypes is not a good idea. Forgetting which opaque container they’ve been stored in counts as “misplacing.” (And of course the container was literally right in front of me.)

This among other things has emphasized the importance of getting some better storage going for the beads and jewelry stuff and small tools and etc. etc. I think the old metal tool chest is going to be my jewelry/small tool storage, so now that I know what it will be good for, I have even more reason to get back to that project.

And now I see I haven’t uploaded any photos of the tool chest. After some extensive searching, it appears that is because I hadn’t taken any pictures. I could have sworn I did!  Well, I do now:

Old tool chest

Needs some work.

(Things needing doing to the chest: finishing cleaning out drawers. Reline with felt? felt over cardboard? velveteen? Possibly repaint the exterior. Would delay getting it into useful state, because it would be better to paint before putting in nice new lining. Unless the lining was easy to remove; see: gluing the fabric to thin cardstock so the liners could be lifted out intact. I’d have to sand it all down before painting, and working around the drawer pulls and the decorative bits would be a real pain; ditto painting around them. But it would be really pretty; I’m imagining a rich metallic green.)

Speaking of photos languishing, I have finally finished uploading all my abused/abandoned bicycle pics, including a few brand spankin’ new ones (but mostly they are old ones, the pictures I first took when I started collecting them). This is the first photo of the latest uploads; go forward from there.
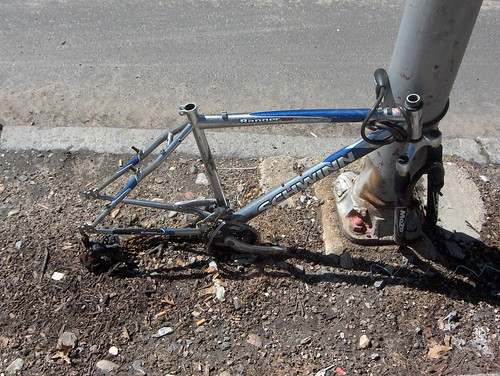
Bicycle without wheels, seat, or handlebars, sinking into the ground.

One of my favorite ruins: Bicycle without wheels, seat, or handlebars, sinking into the ground.

Finished remaking the pigeon bead necklace – after comparing different looks, I went with the metal link style:
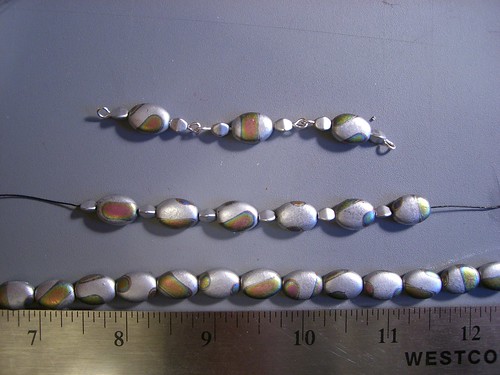
Comparing beads on a string to beads on wire

Comparing two different arrangements of beads on a string to beads on wire

Completed pigeon bead necklace

The finished pigeon bead necklace.

I also made some good attempts at some new styles of ear cuffs, and made a couple of jigs to try and make some of the shaping easier. It turns out that, in at least one case, the jig is actually not that helpful. What was really useful was to carefully wrap some string along the curves of the ear cuff, and mark the string at each place the wire bends. Then lay the string out straight, transfer the marks to paper, and note what each mark means.

When it came to trying to duplicate the shapes, it was much easier to hold a length of wire against that straight template, and grab the wire with my pliers at the given places. Since I ended up doing a couple of variations on this particular pattern, the template came in even handier than the jig, since the template made it easier to place some of the shapes at different places along the curve of the ear cuff. This would all make more sense with pictures, I know, but I’m not done yet, and it really deserves an entire post of documentation on its own.

A few of my fingers are rather sore from bending wire. They can do things my pliers can’t, and sometimes I have pliers in one hand, holding the wire firmly, and I need to shape it. I suppose if I spend enough time doing this, I’ll build up calluses. Or figure out how to do things with other tools, not my fingers!

Also: I was thinking about how to document some of my other techniques, and thinking about how much time it takes to take photos of every step, and write out text to explain every step, I realized I do actually have the technology to record video. And that might be better than still images and text. Setting up the camera to get a good look at what I am doing may be a bit tricky, though; I would like to set it so that the point of view is the same as MY point of view, which means the camera would probably have to be between me and my hands. Could be awkward. We shall see; now that I’ve thought about it, I want to do it. If nothing else, I need to know how it will work!

Another to-do, needing doing since I moved from blogspot to this site: figuring out which tags need to be converted into categories, and properly categorizing the old posts.

Share

Pretty beads

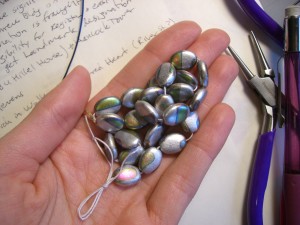
I saw these lovely glass beads in one of the local craft stores (Playtime in Arlington).

Silver beads with oil rainbow colors

Pretty pretty beads, with colors like an oil rainbow.

I kept thinking about them as “peacock beads,” because of the sort of eye shape of the color splotches, and the rainbow look of the colors, even though they aren’t peacock colors at all. Depending on the angle of the light, some of the colors are either pink OR green. Iridescence! Awesome.

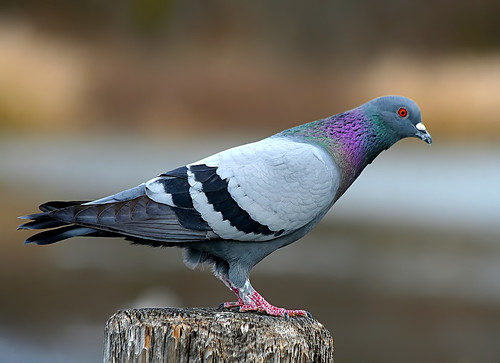
Then I was waiting for a bus yesterday, watching what was going on around me, and realized what bird they really resemble:

Pigeon

Pigeon (aka rock dove) picture from flickr user TexasEagle

Browsing Flickr to find pigeon pictures, because I have none, I found an even more accurate color comparison:

Nicobar pigeon

Nicobar pigeon picture from Flickr user ucumari

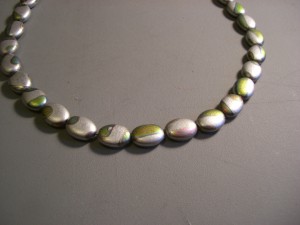
Originally, I made a really simple necklace by just string the beads together on some black cord, but I’m not completely fond of it. The beads kind of swivel around when I wear it, and I think they will look better with some sort of spacer. I found something appropriate, but haven’t rebuilt the necklace yet (also I am torn between a simple beads-on-cord approach, or threading the beads on wire, and linking wired beads together).

Simple necklace of grey "pigeon" beads

Simple necklace is kind of boring, even if the beads are really pretty.

Share