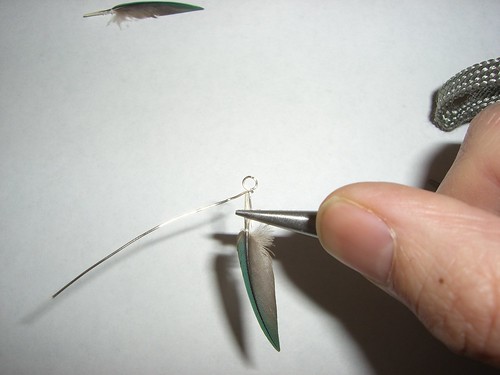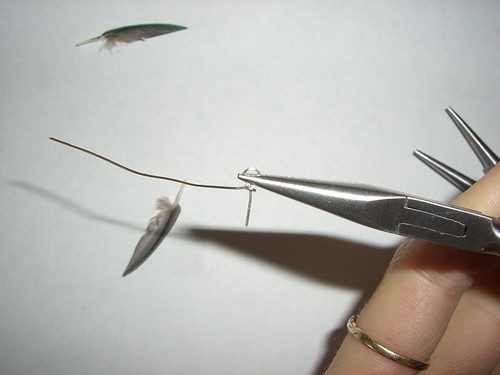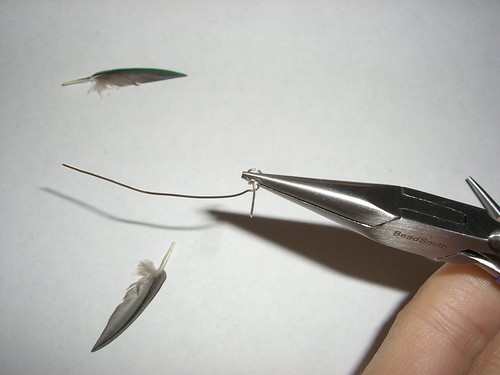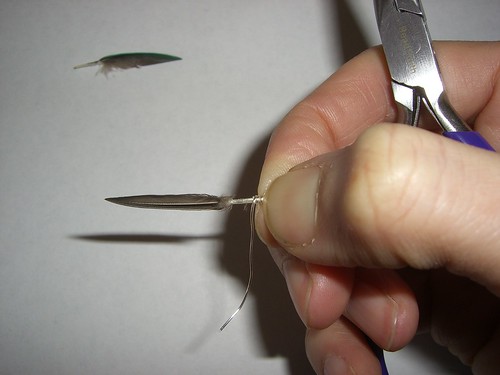
Today I made a deformed frog

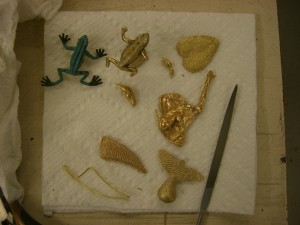
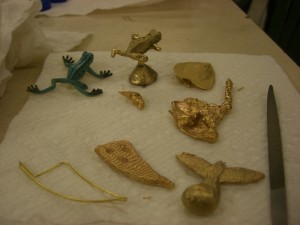
A frog, leaf, blob, bird and tooth shape cast in various methods.

Starting from the frog and going clockwise: Delft clay casting, cuttlebone leaf, water casting, cuttlebone bird and tooth shape.

I took a class this weekend at Artisan’s Asylum called Metalcasting with Sand, Bone, and Water. We learned how to cast shapes freeform, by pouring molten metal into water, how to carve shapes in cuttlebone (which gives you great ripply textures from the cuttlebone – one more tutorial for good measure), and how to use Delft clay (really sand mixed with some kind of oil) to make a mold of another object, and then recreate it with metal.

It was really terrific fun, one of my favorite classes I’ve taken there, and I highly recommend it (I believe it will be run again at some undetermined point).

I attempted to cast my little toy frog using the Delft clay, but its legs are so thin that the metal really couldn’t make it down their full length, so the results are what you see above: a frog with sad little stumps. (Though with a little of the burnt sand/oil mix still on the surface, it could almost pass as some ancient artifact that has mostly survived some great catastrophe. Froggy de Milo?) This is a great method for recreating something that has a lot of fine detail – one person used little plastic fish (flexible, though not as badly as the frog, so it took some extra care to make sure it left a good impression in the clay) – and the results are amazing. It picked up every scale and fine line in the fish’s fins.

We did the water casting to gain some familiarity with the process of melting the metal and then pouring it. The target is a bowl of water, as opposed to the small funnel that we cut into the clay or cuttlebone to pour metal into. (You can see part of the funnel there on the frog’s base.)

The shape is impossible to control precisely, but the height of the crucible above the water does determine how much the metal spreads out. One of the other students got a really interesting shape, like a wide, flat, curving ribbon, by “throwing” the metal into the water. This would be a fun technique to play around with more. (Other people suggested trying things spinning the bowl of water; dropping the metal into a much deeper bowl so that the bottom of the metal would be round instead of flattening out; and dropping the metal into boiling water to see what the bubbling would do.)

The cuttlebone turned out to be my favorite method. The texture that the pieces end up with is so fantastic – it is great for narrow wiggly organic shapes, and for things like wings and fish.

The other side of some of the shapes.

For two of the cuttlebone castings, I attempted to shape both sides. The mold is made by sanding two cuttlebones flat, carving your design into one surface, and then taping them together to pour. It is difficult to figure out how the outline of your shape would show up on both halves of the mold, so usually the cuttlebone shapes are flat on their back side (well, flat except for the natural grain of the cuttlebone).

For the leaf and tooth shape, I attempted to give both sides some depth. With the leaf, I just kind of guessed, and carved the reverse side significantly smaller than the front.

For the tooth, I bent a piece of brass wire into my outline, and then sandwiched it between the pieces of cuttlebone, pushing them together to press the wire into the bone, before beginning to carve – the wire left a nice outline on both pieces for me to follow, and I did get some depth on both sides of the cast. I ended up liking the “reverse” side of the tooth better, because I cut it deeper and with a little more curve to it, and the deeper, more curved shapes showed the texture of the cuttlebone better.

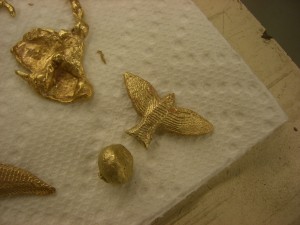
For the last piece, I wanted to really take advantage of the texture, have it work well with the overall form, so I carved a really abstract bird, with spread wings, into the cuttlebone, hoping the ridges would look like really abstracted feathers.

Bird cast in cuttlebone, with the sprue cut away

Bird cast in cuttlebone, with the sprue cut away

I didn’t do any major finishing for the pieces – I trimmed the sprues and filed the sharpest edges down, but I haven’t taken any polishing wheels to them, so they look a little dull (really. after going through several steps of polishing, that brassy metal GLEAMS).

I think it would be really neat to cast some bezels or frames in cuttlebone that I can wire stones into. I think the ridged texture could look really fantastic. The metal we were using for most of the work was some sort of copper alloy (it looks very similar to brass, but I don’t know if it was alloyed with tin or zinc or what), and quite soft, so I could also cast narrow shapes and wind them around stones, like a really, really fat wire. A couple of students brought in silver jewelry they no longer wore, and melted that down for casting; there was additional sterling casting grain on hand that we could buy if we wanted to, but since I was more focused on experimenting with carving shapes into cuttlebone, I didn’t feel like splurging.

There are plans in place to set up an area at the Asylum that is dedicated to jewelry work (and glass – lampworking!!!), which I am really looking forward to.

Of course, I’m going to want to cast steel, too.

Share

I like long walks on the beach, and picking rusted things up off the street

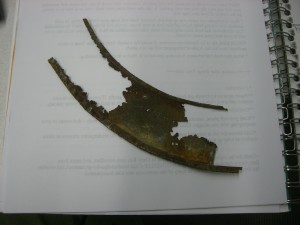
A lovely flat piece of rusted metal

I found this lovely thing on the sidewalk this morning while I was walking to the T.

Most things I pick up like that are smaller and not terribly fragile – old nails or bolts, pieces of chain – and I can immediately stuff them into a pocket, where they will either languish for months (if in my jacket), or be discovered in the washing machine in a week or two.

This was too big and too fragile to fit into a pocket, but I had some time while waiting for the train to arrive to carefully stow it inside a notebook, like a pressed flower.

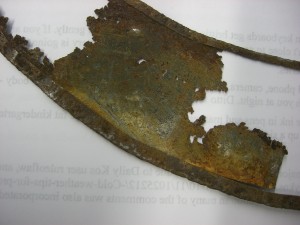
A closer look at one side of the metal thing.

Gorgeous, isn’t it?

I don’t know what I’ll do with this. I think it is probably too fragile, and possibly too big, and too corroded, to be used for jewelry, though it would be amazing as the main piece of a necklace. I suppose it could be made into a necklace or pectoral that isn’t actually intended to be worn, but at that point, I’d rather make something that is definitely NOT meant to be worn. While I appreciate art that results in something that appears functional but is really just meant to be looked at, I also find it kind of irritating, so I am disinclined to do that sort of thing myself.

Besides, I still have plenty of materials for making actually wearable pieces of jewelry; here are the first things I made in my first day using my space at Artisan’s Asylum:

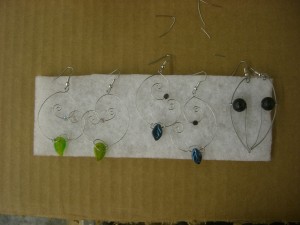
Stainless steel wire, glass beads, lava beads

It was fantastic having a work space that isn’t doubling as kitchen counter, miscellaneous craft table, or horizontal surface of holding all the stuff. I’m realistic enough to know that my uncluttered work surface won’t stay that way for long, but I am enjoying the hell out of it while it lasts (and at least it will NEVER be competing with the production of a big meal, so there’s that).

These are not new designs, but OMG I am out of practice. It took way too long to get those damn spirally earrings right; in the process, I created and then had to cut up another 2 pairs (had to cut them up at 80% done to free the beads).

The workspace isn’t completely set up yet: I bought 3 full sheets of OSB to lay down as the floor, thinking it would be nicer to walk on that than concrete, and also less likely to end in the destruction of fragile dropped things, but the walls of my space are not quite big enough to just lay the boards down.

They are supposed to be 8 feet apart, which would be perfect, but they are about 2 inches too close together.

So I have to haul the OSB all the way to the wood shop, trim 2 inches off one end of each sheet, and then haul it back, and I am not fit enough to do more than maybe one of those a day.

The 1/3 of the floor that I have put the OSB down on is much nicer to walk on, however, and the sooner I get the rest cut and laid down, the sooner I can bring in more shelving and work surface and . . . stuff.

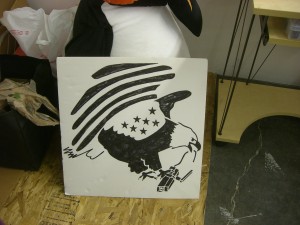
The floor, in progress, with anti-surveillance eagle sign, and penguin.

The stencil version of the anti-surveillance eagle works quite well as  stencil; I used it to make a large sign on foamcore. The penguin supporting it I deny all responsibility for.

ANYWAY. As soon as I get more work surfaces set up, the sooner I can lay out and admire the contents of my various boxes of random rusted metal things (I got 26 pounds shipped to me from home recently!), and figure out if I can find a good use for my newest acquisition.

Share

Experiments with titanium, Swapfest loot, and other progress

So I finally started playing with the titanium wire I ordered recently.

It is very lovely stuff – matte metallics colors (it is anodized), and a soft surface unlike any other metal (probably from the anodization).

It is also, as the website said, difficult to work with. I cannot put sharp bends in it; it will break. Right away. It work hardens FAST. And, like the website said, its temper is similar to spring steel, so I have to bend it well past where I want it to be in order for it to stay where I want it. It is also very light; holding one of the small coils, I had a hard time believing I was holding a metal (well, maybe aluminum).

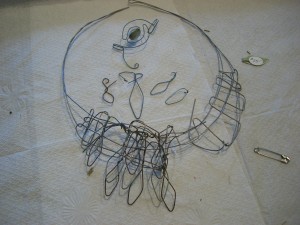
An ear cuff, necklace concept in progress, and random bent shapes.

I don’t feel like I’ve got a good handle on how to use it yet; perhaps if I made the entire necklace from the same color? (The test piece is stainless steel for the support structure, and two different colors of titanium for the layered leaves.)

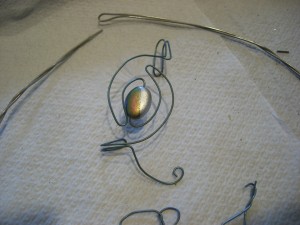
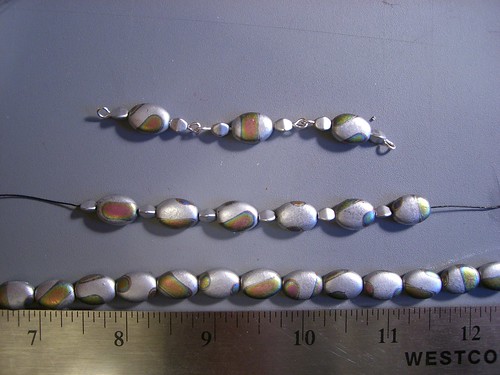
I do like how the colors of some of the wires work with the rainbow hues on my grey glass beads:

Shiny! The wire is a greyish blue; the bead has some similar colors in it.

In other exciting materials and supplies news, I made it to Swapfest, and got:

– 2 exceptionally lovely bearings

– 1 mystery object that might have come out of an old textile mill

– 2 hard drives with platters held in place with screws and not the mysterious unremovable mechanism some of my other junk drives have, not that I’m still bitter about that

– 1 box of random metal junk, which cost me $1, and was worth at least $2 in entertainment value

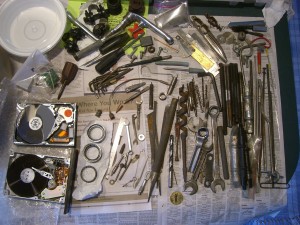
Everything from the box of random junk, laid out nicely. (plus hard drives and bearings from other sellers)

There are some small wrenches in that pile of stuff. And by “small” I mean “about the length of my finger THEY ARE ADORABLE.” Most of the weight of that box is made up by things that I think are bike parts. I don’t need them, but lugging them around was a reasonable payment for the small wrenches and other random small metal objects that I am going to clean and keep and eventually incorporate into . . . something.

There was also a piece of lead, in sheet form, in the box, which is now safely contained in a plastic bag. I don’t need a piece of lead sheet metal running around loose and contaminating the place.

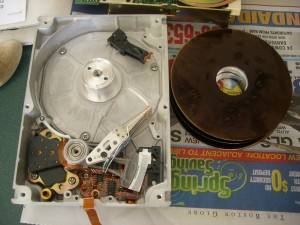
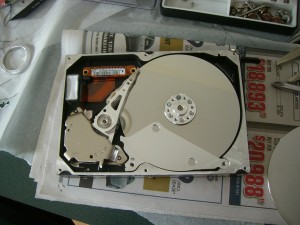
The disk drives were also entertaining. One has unusually dark platters; the other had some fantastic machined pieces of metal separating its platters.

Yes, the platters really are dark brown.

Here's the metal piece separating two platters in the other drive.

Later, I discovered that if you hold a platter up so you can see your face in it, you can get some really odd effects if you move the platter around while looking at the reflection, because you will also see two blurry circles of the background at the same time. If you close one eye, you will only get one blurry circle, which leads to fun things like moving the platter so that the circle (the hole in the center of the platter) is where the reflection of your eye should be. It’s like being inside a Magritte, only instead of having an apple for a head, you have a potted plant for an eye.

It is very difficult to get good photographs of this.

Um.

Anyway.

I’ve also (finally) got two tiny book pendants put on cords and ready to photograph and eventually list on Etsy. I’m seriously considering opening up another online store on another site, but there are SO MANY other sites that I’m feeling a bit overwhelmed with trying to choose.

Oh and I decoupaged the mannequin! At least partially. I didn’t think it was necessary to decoupage the entire thing, since I won’t be photographing the whole mannequin, just the portions necessary to show up jewelry. So she looks like she’s wearing a very stylish sort of crop-top, since the decoupage, which has uneven edges, stops somewhere above her navel.

Share

Body parts by mail and other fun

Since most of my necklaces do not lie nice and flat on either a table or a quick-and-easy necklace bust, I decided that the best way to photograph them – and form them, to a certain extent – would be to acquire a mannequin.

Here is my new assistant, who is close enough to my size that I can dress her up with my own clothes (. . . which is more disturbing to think about than I was expecting). I think she needs a layer of decoupage (her actual color is a much more unappealing brownish pink than the photo shows, not to mention the texture of the plastic). And a name.

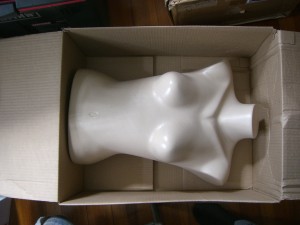
Plastic female mannequin torso in a cardboard box

Now I know how much of my dismembered carcass would fit in a box. Most of it, is the answer. There's plenty of room in there for arms and legs. (Also note the lack of packing material provided.)

So I’m working on some projects for a literacy fundraiser, which means literary themes (hence TINY BOOKS!), and somehow my original ideas unexpectedly turned into an idea for a mess of beads and charms linked together in a way that I usually don’t work with because making links kinda makes me want to cry or throw everything out the window, but it was such a neat concept that I couldn’t resist. *sigh*

Um.

Anyway.

I decided that to make the links less tediously the same (it is contemplating the sameness that fills me with despair and loathing), I would add leaf and tendril elements to some or all of them.

Of course this means I couldn’t just decide that the first way I found to do it – which is a perfectly reasonable way! – was good enough and stick with it, oh no, suddenly I have MANY MORE IDEAS for how to make bead links more interesting while incorporating leafy things. So instead of working on the damn project, I am sketching ideas onto the paper and then compelled to test them out for real.

Because if I don’t, they will bother me until I do.

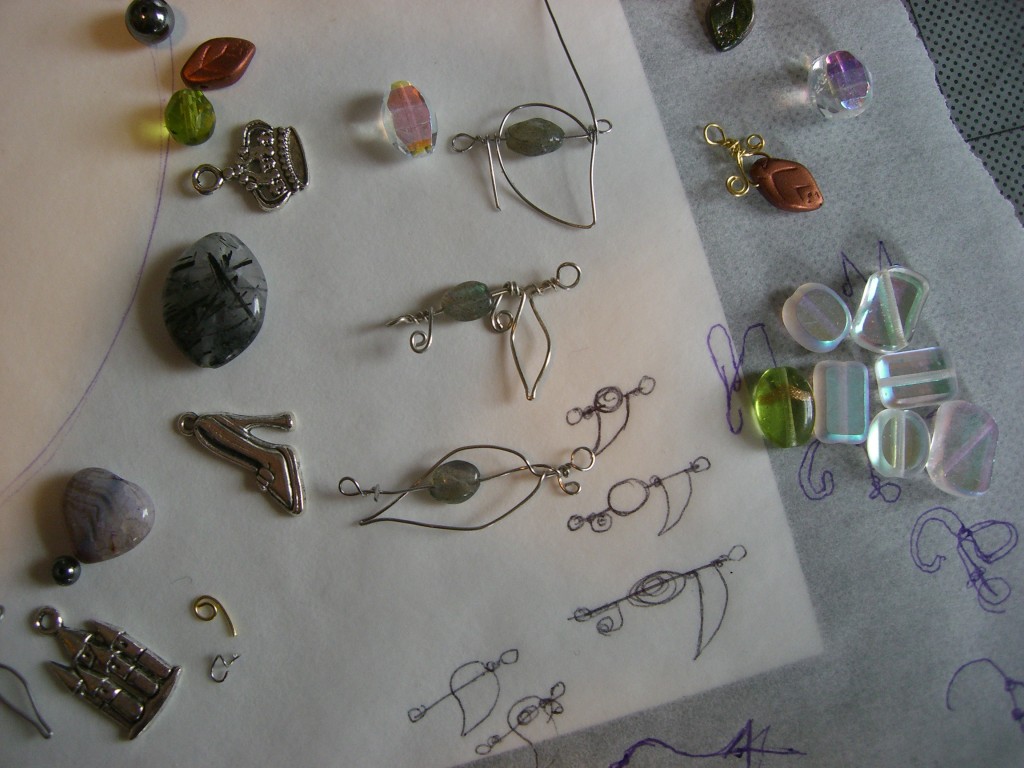
Some sketches and prototypes for ways of linking beads together while making the wire do interesting things. The link in the middle is what I am currently using; the link on the bottom I like a lot but haven't used - yet. The one on the top seemed like a good idea when I sketch it, but I dislike it now. The beads and charms on the left are part of the necklace that is troubling me; the pile on the right consists of potential components.

I’ve probably said it before, but the mechanical aspects of making jewelry with wire is at least half the fun. So I may be complaining about feeling forced to experiment when I have something that needs finishing, but it’s like complaining about having to choose between hot fudge and caramel. (Naturally, one puts both on, arranged so that they can be enjoyed separately OR together.)

Speaking of exciting mechanical challenges:

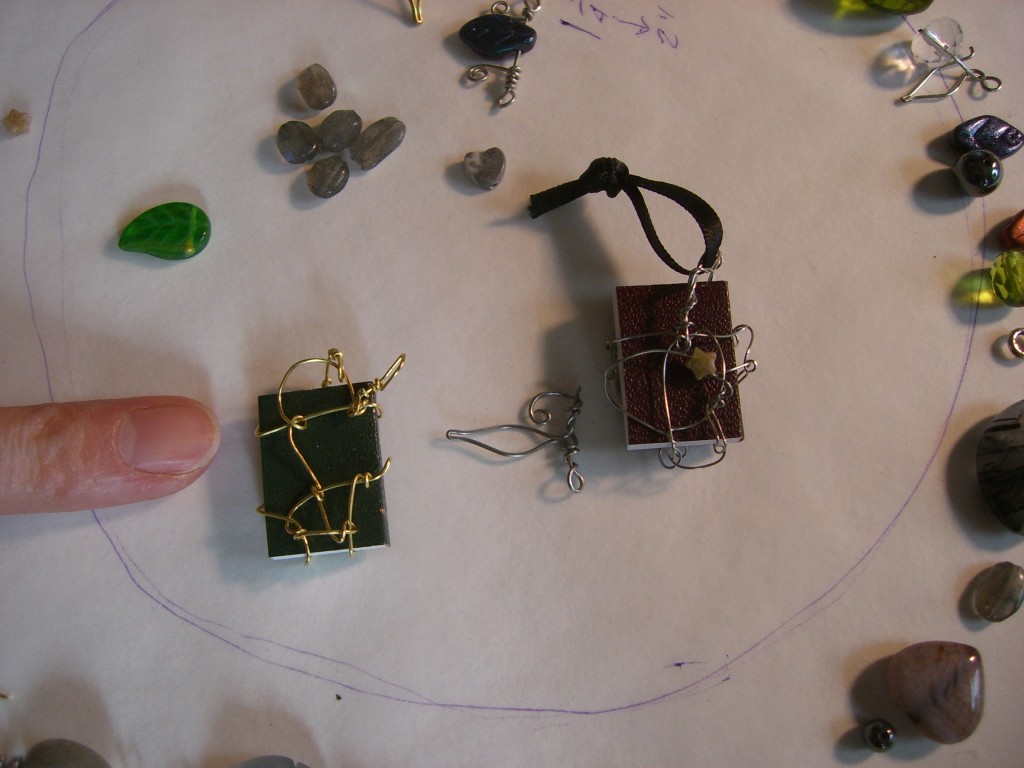
Two TINY BOOKS wrapped in wire, to be used as pendants.

Two TINY BOOKS! Carefully wrapped in wire such that they can be worn as pendants! AND TAKEN OUT OF THEIR TINY CAGES!!

My excitement about these things is inversely proportional to their size.

And also, the ideas for enclosing them! TOO MANY. Or, perhaps, just enough; some of them are clearly awful even on paper. Whatever, there isn’t enough time to give them all a proper tryout.

I have another project in mind that is more of a research project than a physical making-stuff project: there are approximately TOO MANY TOO COUNT different online marketplaces focused on selling handmade stuff, and they all offer slightly different costs and benefits, and I have yet to find any single source that puts them all together so that you can, at a quick glance, compare them.

This is on my to-do list now.

Share

Brass wire can cut itself

This weekend was productive, and I learned several new things.

Like how to wrap wire around tiny books.

And that, if you wrap thin brass wire around more thin brass wire, and then use your pliers to smash the coils flat, and you use enough force, the coils will cut through the wire they are coiled around.

So I will be redoing that piece.

It was only 90% perfect anyway. And I can probably reuse parts of it.

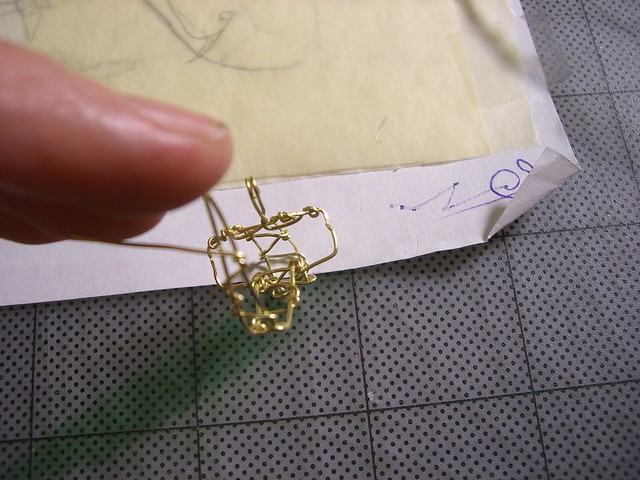
See that bent bit on the right edge? That's not supposed to be nearly cut in two.

I started making some new displays for earrings and pendants. I still don’t have a good method for the necklaces, but in the process of making the new hanging displays, I ended up with a tiny wire bird, about the right size to be incorporated into wire necklaces, although this particular bird seems quite attached to the display. Oh no, I shall have to make another! Or, perhaps, an entire flock.

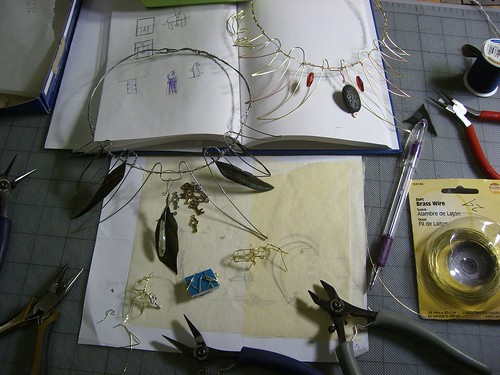
Two necklaces and some experiments in wire wrapping tiny books.

Yes, those little messy looking tangles of brass are for the books, and the blue thing is a book, so there’s some scale for you.

The skin on several of my fingers is covered all over with what look like very light cuts. I am pretty sure it is just from using my soft, uncalloused fingers to pull and bend thin brass and stainless steel (there was a lot of that in the display) over and over again. It’s pretty remarkable; my fingertips look like they were on the verge of losing a papercut war. Clearly I need to spend more time at this, and build up tougher skin.

Share

Wire wrapping feathers

For some strange reason – well, a couple of strange reasons, actually – I have a lot of feathers, and limiting myself to gluing them to things is kind of, well, limiting. Especially if I want to make dangly earrings, or necklaces, or or things, with them.

Wire wrapping seemed like the easiest way to make dangly things with them. I can’t recall if I found any examples online before I got started (my first page of Google hits now doesn’t turn up any particularly good tutorials), so let’s just say I made it up as I went along.

I have a lovely photoset at Flickr, with instructions, or you can read it all right here. (One of these days, I may also make an Instructable, but when I started one a week or two ago, the interface was so aggravating that I gave up.)

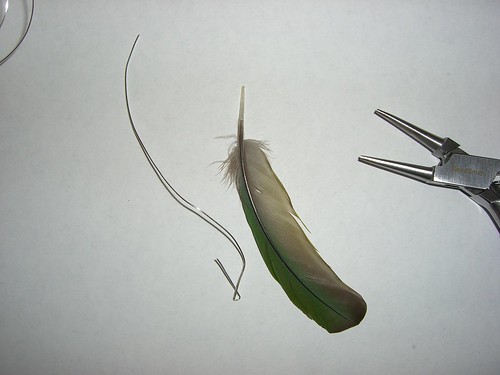
First, you need the following tools and materials:

  • round-nose pliers*
  • flat nose pliers*
  • wire cutters
  • feathers
  • very thin wire (I used 26 gauge)

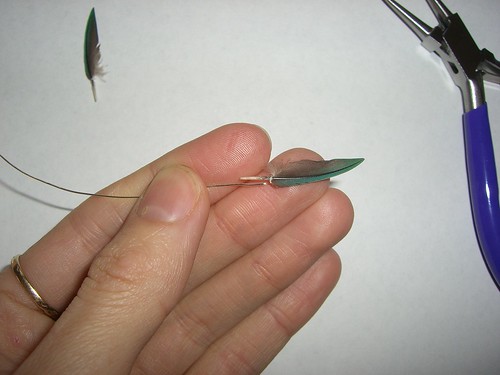
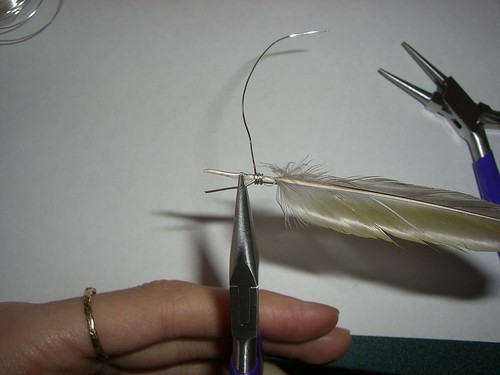
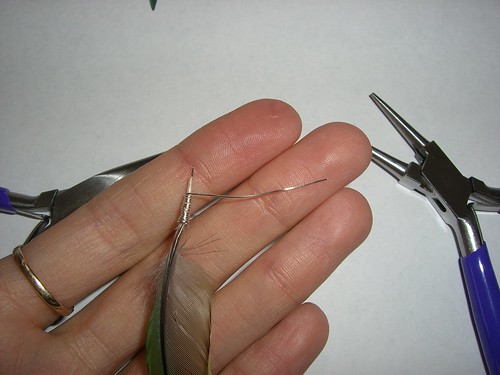
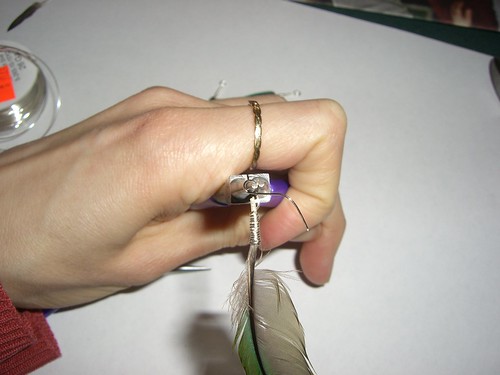
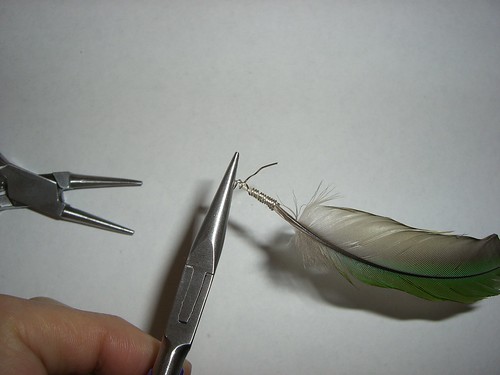
I tried two different methods. The first starts by forming a loop (with one short end and one long end) in the wire, to hang the feather from, and then wrapping wire down the shaft of the feather, trapping the short end of the wire against the feather shaft. The second starts by wrapping wire UP the shaft of the feather, again trapping wire against the shaft, then forming the hanging loop, and finishing by wrapping the remaining wire back down the shaft. I like the first method better, but both seem to create a pretty firm connection between the wire and the feather, though I didn’t try REALLY REALLY HARD to pull the feathers free.

So. On to the wrapping:

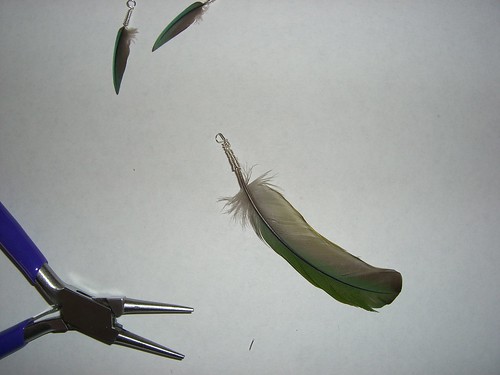
Measuring the wire by jfeathersmith.

Because this was a tiny feather (OMG do not use a tiny feather for your first try) I wanted to have almost as much straight wire held against the feather as there was bare feather shaft. It seemed like it would be the strongest way to wire the feather, and aesthetically appealing.

Measuring the wire (2) by jfeathersmith.

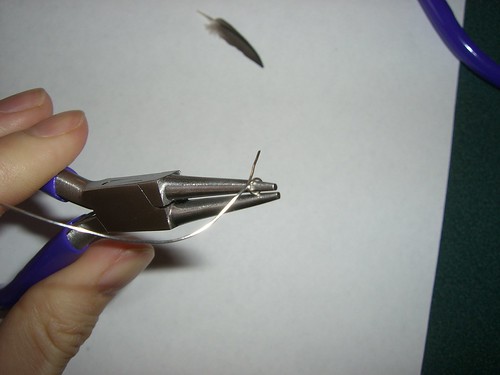
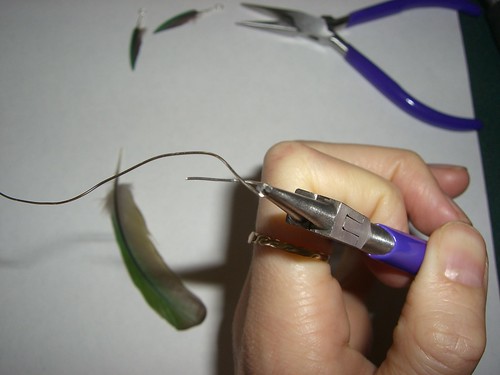
I grabbed the wire with the round-nose pliers where I wanted the straight part to end, and the loop (to hang the feather from) to begin.

Make a wire loop by jfeathersmith.

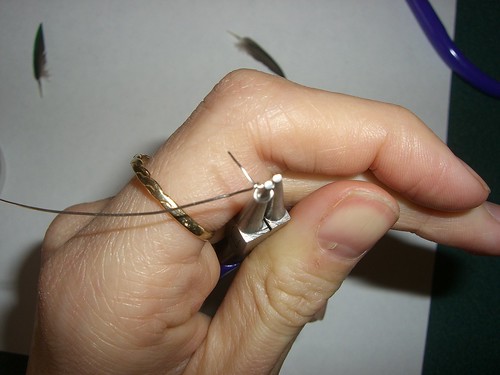
I wrapped the long end (still attached to the spool, because I like making life more complicated) around the pliers to complete the loop.

Completing the loop by jfeathersmith.

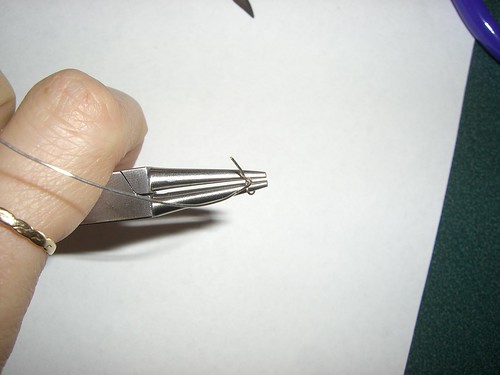
Then I bent the long end back around the short straight end, to start the wrapping of wire around the straight wire plus - in a moment - the feather.

Another view of the loop by jfeathersmith.

Another view of the loop

Is the length right? by jfeathersmith.

I checked to make sure I still had the right length of wire to hold next to the shaft, and finally cut the long wire free of the spool, so I had about 2 inches of wire to wrap -around- the shaft and short end.

Preparing to wrap the feather by jfeathersmith.

Why you should not use a tiny feather: Because holding the thin wire and the thin shaft together tightly while also wrapping thin wire AROUND them both is a pain in the butt. Holding the short wire and the shaft really tightly with pliers helped some (yes, it squashed the shaft. in fact I think it broke it a bit. it doesn't matter; you can't see it when you're done).

Examine this loop by jfeathersmith.

See that tiny loop of wire wrapped around the straight wire? Adjust that slightly if necessary so that it is just big enough to hold the very end of the feather shaft. That helps with the final wrapping.

Another view of the shaft-holding loop by jfeathersmith.

Another view of the loop

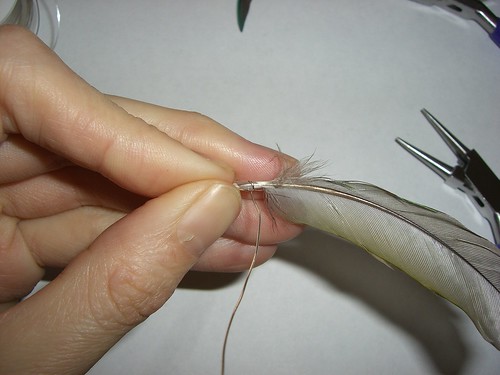
Grasp firmly and wrap by jfeathersmith.

I gave up on the pliers because I couldn't get coordinated enough to manage and just pinched the feather+wire together tightly with my fingers. Having fingernails helps. Once I had the short piece of wire and the feather closely aligned, and the shaft of the feather just butting against the loop, I wrapped the long piece of wire around and around the shaft+wire combo.

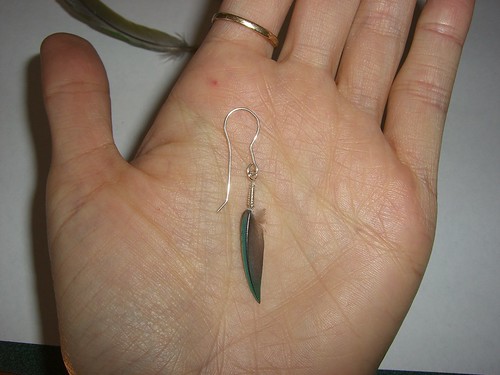
Wire-wrapped feather earring by jfeathersmith.

Connect the feather to an earring loop, and you are done!

Thus endeth the lesson.

I didn’t keep the above earring; that’s just for photographic purposes. I wrapped another tiny feather and made these:

Feather and labradorite earrings by jfeathersmith.

Feather and labradorite earrings. I have some tiny beads made from labradorite; in the right light, they show a blue "flash" that matches the feathers.

I also made an earcuff with a feather dangle, but those photos will be another post, because I have several other earcuffs I want to post at the same time.

Here is method 2 for wire wrapping a feather, but I didn’t like the results as well:

A larger feather by jfeathersmith.

This time, I started wrapping near the fluffy part of the feather, not at the end of the shaft. I didn't want to wrap the entire bare shaft, because it was fairly long. I still wanted about half an inch of overlap between wire and feather, so I formed a loop about that far from one end of the wire (which I cut this time before starting! I CAN HAS LEARNINGS). This loop is not for hanging the feather, it will go around the shaft about half an inch from the end.

Forming the bottom loop by jfeathersmith.

Forming the first loop

Insert feather into loop by jfeathersmith.

I placed the loop in the right position against the feather.

Wire held against feather by jfeathersmith.

Another view of the wire and feather held together

Starting the wrapping by jfeathersmith.

I again found it easier to start wrapping by holding the thing in my fingers. Here I have wrapped the wire around the feather+short wire once.

Ready to finish wrapping by jfeathersmith.

With the larger feather, and more shaft to work with, this time I found it easy to grab the wire and feather with the flat-nose pliers, and wrap the remaining wire around by hand. Part of the trick is that the wire is thinner than the feather shaft, so to hold both together, you really have to squash the feather. Otherwise, that dang wire will slide all over the place.

Wrapping in progress by jfeathersmith.

Don't worry about how the short wire is not tight against the shaft. As you wrap the long wire around them both, it will pull the shaft and short wire together. You will need to move the pliers out of the way; by this point, you don't need a death grip on the assembly, so you can place them over the wrapped section and hold firmly, just not so firmly you flatten things out.

Nearly done by jfeathersmith.

I didn't get the wire positioned quite where I wanted, as there is a short bit of it sticking past the shaft. That can be clipped off.

Make the hanging loop by jfeathersmith.

Now I have just enough wire left to make a loop to hang the feather from. I'm not wrapping to the very end of the shaft right now, because I will finish that after making the hanging loop.

Preparing to make the loop by jfeathersmith.

I straightened out the wire so that it will be easier to wrap part of it against the shaft after I make the loop.

Making the hanging loop by jfeathersmith.

I used the round-nose pliers to make a loop at the end of the shaft. The bare bit of the shaft end, and the wire next to it, will be wrapped with the remaining wire.

Complete wrapping by jfeathersmith.

I grabbed the loop with the flat-nose pliers, and wrapped the remaining wire back down the shaft, trapping the straight wire against it.

Wire-wrapped feather by jfeathersmith.

Finished!

* Some asides about pliers: Really, you could do this all with a single pair of needle-nose pliers, the kind you get at a hardware store. You won’t be able to get perfectly round loops, but if you don’t mind the look of a square-ish loop, go for it (I don’t have photos of this). You could also form the loop by wrapping the wire around a thin stick, like a bamboo skewer; the pliers just help hold the wire still while you wrap it. Also: most pliers not intended for jewelery-making have ridges/serrations on their jaws. These will mar the wire, which is a look you  might like, but if not, wrap some tape (electrical, duct, whatever) around the serrated parts to protect the wire.

Share

Origami Easter

Despite having prettier kleenex boxes around this year (same pattern as last, but blue or pink or purple), I decided not to repeat last year’s Easter basket. I went for origami as the easiest way to make a container to hold tasty chocolate treats.

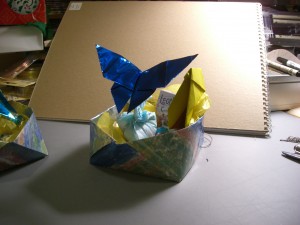
Easter basket with butterfly and chick

I used this basket pattern, plus the baby chicken and butterfly patterns from Kunihiko Kasahara’s Creative Origami (the book I learned origami from, many years ago), to make the origami pieces. The paper for the baskets came from my endless supply of gently used wrapping paper; the paper for the chick and butterfly came from my supply of actual origami paper, which remains a surprisingly consistent size over the years.

I filled the baskets with crumpled tissue paper and a variety of foil-wrapped eggs. The blue tissue bundles hold malted eggs, and ended up forming part of the support for the butterflies.

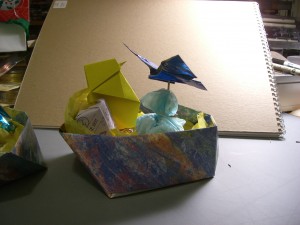
Origami Easter basket with butterfly and chick

I used the tissue bundles to support the butterflies, by pushing one end of a flat toothpick into the twist of the bundle, and the other end into the folds of the butterfly’s body (no puncturing of paper necessary; the folds are tight enough to hold the toothpick, as long as you don’t jostle the arrangement!).

I didn’t plan this out carefully in advance; I started with “I’ll make baskets with an origami fold and tissue paper fill.” Then I thought it needed something more interesting to decorate it with because I didn’t buy any little toys, and chicks are traditional (that is the 2nd fold I ever memorized) . . . and a butterfly would be a nice touch and oh hey I bet if I stuck a toothpick into the folds of the butterfly I could prop it up better instead of just setting it on top of everything, and from the right angle it’ll look like it’s flying! Hey, look, those tissue bundles might come in handy.

I also thought about making an origami flower, but I didn’t like the look of any of the folds. So the butterfly is going to have to find another place to get breakfast.

Share

The world’s ugliest lightbox

I’m not a very proficient photographer, and I don’t have a lot of patience for fiddling with the various settings on my camera to get perfect results, so when I saw some easy instructions for how to build your own lightbox, I made a mental note of it. I figured someday it might be a useful thing to know how to do, if I had small objects I wanted to make some effort to photograph nicely. I know I can always adjust things in Photoshop later, but I’d rather not have to add that step to the process.

Since I started making more jewelry, I’ve become even more bothered by the crappy pictures I’ve been getting under inferior artificial light, so a week or so ago, I looked up the “How to build a lightbox” instructions, and built my own last night.

Here is one such tutorial via Strobist.

Here is another using fabric instead of trace or tissue paper.

Google provides a variety of other alternatives; I saw another one built out of foam core, with solid walls; illumination is provided by clamping lights to the front walls and aiming them into the box (instead of lighting the exterior, and diffusing the light with trace paper or fabric).

Here’s my version:

Lightbox built from binder clips and used Priority Mail boxes

One clip-on lamp + one ugly old saved-from-a-basement lamp = my light sources.

It’s made from two Priority Mail boxes, with trace paper covering the cut-outs in the sides and top. I use binder clips to hold the two pieces together. I cut the top so I can lift a flap of paper out of the way and take photos from above my subject; it is generally held (mostly) in place with tape.

Yeah, it’s ugly, and it probably took longer to make than if I’d started with a single box of the right size. And there are gaps where there technically shouldn’t be. BUT it can be taken apart and stored flat, so it takes up very little space!

Here are some pictures I took to test it all out:

Testing white balance

Not too shabby.

Another white balance test

Also not bad. If only I'd made notes about what the camera settings were.

Overhead picture

I cut a hole in the trace paper on the box top so I could take overhead pictures.

Flash!

Flash! A bit too yellow.

One of my current light sources is a fluorescent bulb, which is not really as bright as I’d like; this will be an easy fix (in fact now that I think about it, I think I might have a nice incandescent stored in a large yogurt container on the little table next to the window). Usually I only use that light, clipped to a bookcase, to provide additional light when I need to use my big mirror. It turns out the clip part of it balances very well when placed on the desk, so the lamp can be a desk lamp without needing to be clipped to the edge of the desk! Nice design, that.

I do want to get a large sheet of white paper to cover the back and create the bottom of the light box; the cutting mat and brown cardboard are not particularly nice.

I originally thought about making a teeny tiny lightbox out of a kleenex box, but it’s easier to put different backdrops and props into the bigger box. (I may make a tiny one anyway, because it would be fun and cute.)

Share

Pondering colors and seasons

Ignoring all the wires that have some sort of enamel coating to give them color (and also ignoring fancy metals like niobium and titanium, which can be turned pretty colors through exciting electrical processes), metal wire doesn’t come in very many different colors. Really only 3 dramatically different colors (reddish yellow being awfully close to either yellow – brass – or copper – rose gold).

There’s silver: silver, steel (stainless or galvanized), aluminum

There’s yellow: brass, gold, bronze

There’s reddish yellow: brass (sometimes), gold

There’s reddish brown: copper

I’ve been thinking about colors evocative of the seasons, and winter is easy: silver, accented with blue, grey, white, silver, mauve. Maybe some other very pale pinks and blues and purples: I see those in the cloudy winter sky.

Fall is also super easy: copper or yellow metal, accented with red, yellow, orange, brown. Maybe a little purple. (Why purple? I don’t know. It just seems right.) Maybe some dark green.

Spring is a little tricky, actually. Should it be silver accented with green? (And/or some early spring blossom colors, which tend to yellows and purples and blues, though of course tulips are any color you want.) Or yellow accented with green? Then what happens with summer? Because summer is where I get really stuck. Maybe summer should be yellow with green. But there are lots of different colors of flowers in the summer. So I don’t know. Light green for spring, dark green for summer?

Share

Weekend summary: pigeon bead necklace done and other things in progress

Helpful hint: Misplacing your prototypes is not a good idea. Forgetting which opaque container they’ve been stored in counts as “misplacing.” (And of course the container was literally right in front of me.)

This among other things has emphasized the importance of getting some better storage going for the beads and jewelry stuff and small tools and etc. etc. I think the old metal tool chest is going to be my jewelry/small tool storage, so now that I know what it will be good for, I have even more reason to get back to that project.

And now I see I haven’t uploaded any photos of the tool chest. After some extensive searching, it appears that is because I hadn’t taken any pictures. I could have sworn I did!  Well, I do now:

Old tool chest

Needs some work.

(Things needing doing to the chest: finishing cleaning out drawers. Reline with felt? felt over cardboard? velveteen? Possibly repaint the exterior. Would delay getting it into useful state, because it would be better to paint before putting in nice new lining. Unless the lining was easy to remove; see: gluing the fabric to thin cardstock so the liners could be lifted out intact. I’d have to sand it all down before painting, and working around the drawer pulls and the decorative bits would be a real pain; ditto painting around them. But it would be really pretty; I’m imagining a rich metallic green.)

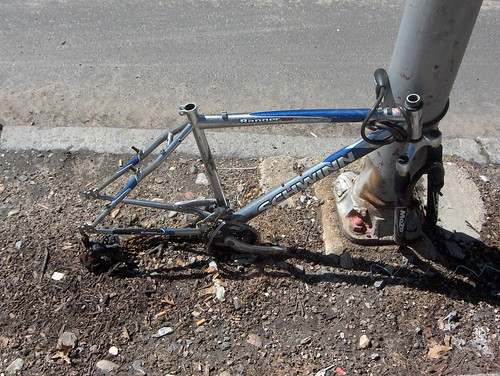
Speaking of photos languishing, I have finally finished uploading all my abused/abandoned bicycle pics, including a few brand spankin’ new ones (but mostly they are old ones, the pictures I first took when I started collecting them). This is the first photo of the latest uploads; go forward from there.

Bicycle without wheels, seat, or handlebars, sinking into the ground.

One of my favorite ruins: Bicycle without wheels, seat, or handlebars, sinking into the ground.

Finished remaking the pigeon bead necklace – after comparing different looks, I went with the metal link style:

Comparing beads on a string to beads on wire

Comparing two different arrangements of beads on a string to beads on wire

Completed pigeon bead necklace

The finished pigeon bead necklace.

I also made some good attempts at some new styles of ear cuffs, and made a couple of jigs to try and make some of the shaping easier. It turns out that, in at least one case, the jig is actually not that helpful. What was really useful was to carefully wrap some string along the curves of the ear cuff, and mark the string at each place the wire bends. Then lay the string out straight, transfer the marks to paper, and note what each mark means.

When it came to trying to duplicate the shapes, it was much easier to hold a length of wire against that straight template, and grab the wire with my pliers at the given places. Since I ended up doing a couple of variations on this particular pattern, the template came in even handier than the jig, since the template made it easier to place some of the shapes at different places along the curve of the ear cuff. This would all make more sense with pictures, I know, but I’m not done yet, and it really deserves an entire post of documentation on its own.

A few of my fingers are rather sore from bending wire. They can do things my pliers can’t, and sometimes I have pliers in one hand, holding the wire firmly, and I need to shape it. I suppose if I spend enough time doing this, I’ll build up calluses. Or figure out how to do things with other tools, not my fingers!

Also: I was thinking about how to document some of my other techniques, and thinking about how much time it takes to take photos of every step, and write out text to explain every step, I realized I do actually have the technology to record video. And that might be better than still images and text. Setting up the camera to get a good look at what I am doing may be a bit tricky, though; I would like to set it so that the point of view is the same as MY point of view, which means the camera would probably have to be between me and my hands. Could be awkward. We shall see; now that I’ve thought about it, I want to do it. If nothing else, I need to know how it will work!

Another to-do, needing doing since I moved from blogspot to this site: figuring out which tags need to be converted into categories, and properly categorizing the old posts.

Share