Project: Turning a zombie into a mutant aquatic creature, Part 1, the skinning

So Willoughby & Baltic is going to put together an interactive Halloween show at the Charles River Museum of Industry.

It’ll be in three parts, and the third part, the part that appeals the most to me, is a series of interactive “exhibits” of weird aquatic creatures that have been captured or created or something by a mad scientist, in approximately 1910.

I’d been thinking about getting some plastic creatures – fish, lobsters, reptiles – and hacking them apart and gluing them back together in ways Nature never intended, and then figuring out a way to animate them [It’s ALIVE!!!].

And then I walked into the Walgreens near work, and found Ed.


Dead Ed, the Crawling Zombie.

When the switch in his hand is pressed (or, if he’s set to react to noise/motion, when the noise/motion sensors are tripped), his red LED eyes light up, he moans and groans and says things like “I can only crawl after ya so fast!,” and his arms start moving at a frantic pace, gradually pulling his legless body across the floor.

You can see the potential.

It took me a day or two to decide I really wanted to acquire one of these, because none of them in the store actually worked, and while it might have been due to dead batteries, maybe it wasn’t. Well, it wasn’t.

I tried Dead Ed out on the kitchen floor, with Claude perched inside my collar. In retrospect, that might not have been the most brilliant move on my part, but Claude is rarely inclined to giving me harsh warning bites when something frightens him. Instead, he kind of puffed himself up and growled and muttered while Dead Ed skittered around the floor and groaned about not being able to feel his legs.

When I offered my finger to Claude, suggesting that he go hang out on the floor and take a closer look, he refused utterly.

Later, after the birds were tucked into bed, I took Dead Ed up to my work space and got out a utility knife, to get to the business of figuring out what sort of mechanism and structure I really had to work with under that rubbery green skin.

I used a utility knife to cut around the base of the skin, thinking I could just roll it up over itself and remove it that way. During that process, I realized that the motion sensor was glued into the skin, so I had to cut around that, too.


It was fairly tricky to actually fold the skin back on itself, and I realized it would not be possible to pull it up over the shoulders. Unless I removed the arms, first.

So I cut the arms off at the seam – well, I should I say I pulled them apart at the seam, as the glue holding them on was quite weak. It was fairly easy to pull the arm skin off of the armature, which was nothing more than some stiff wire, bent into an arm shape (oooh! And bendable into other configurations!).


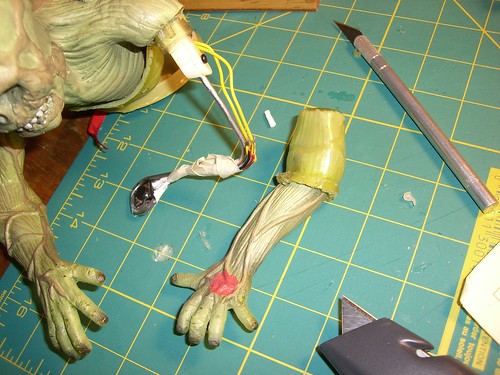
The left arm contained the wiring for the switch; the right arm was just a piece of wire.

Not so scary-looking now, are you.

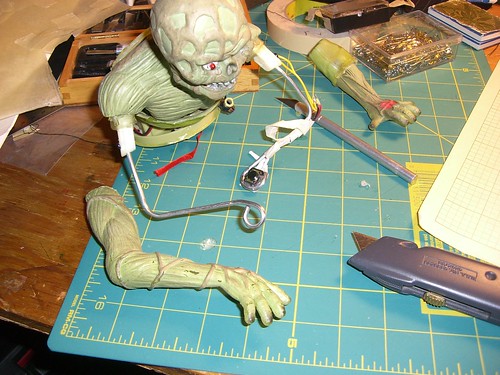
I still had to remove the arms, which turned out to be fairly simple. Each arm (the stiff wire) was held in place by a piece of plastic that was screwed into the shoulder. Once the plastic cover was removed, the arm could be pulled free.


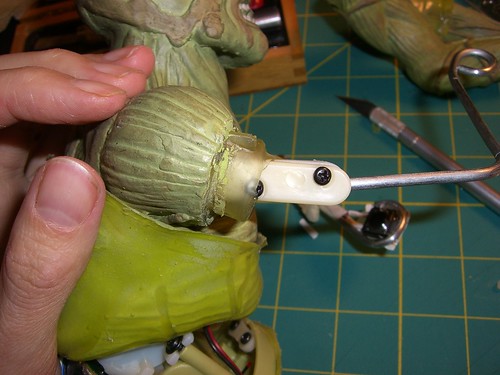
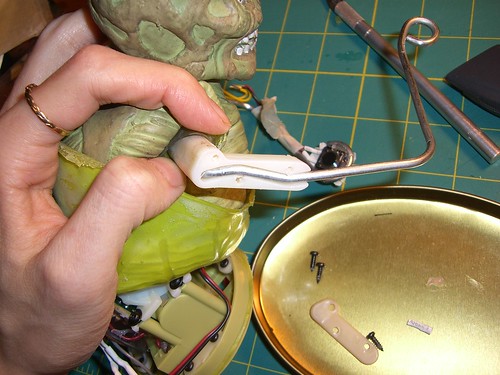
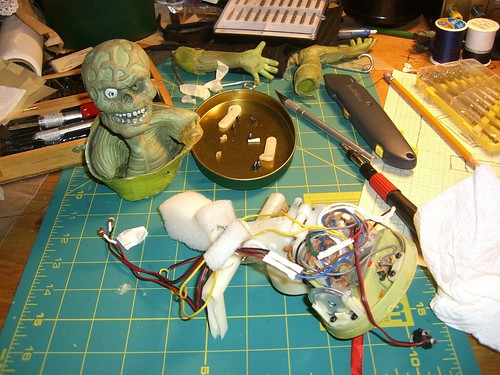
Note use of lid of sewing box to keep small screws and things from rolling away.


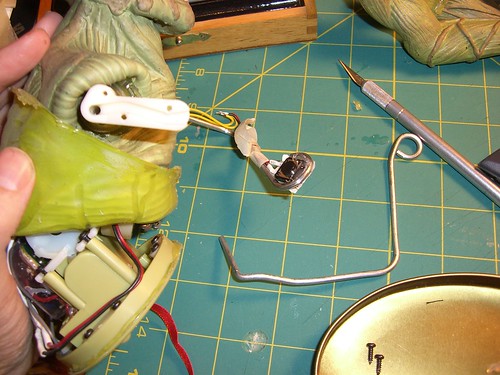
Once the arms were removed, the skin of the body was much easier to remove. It was also greasier inside than I expected.
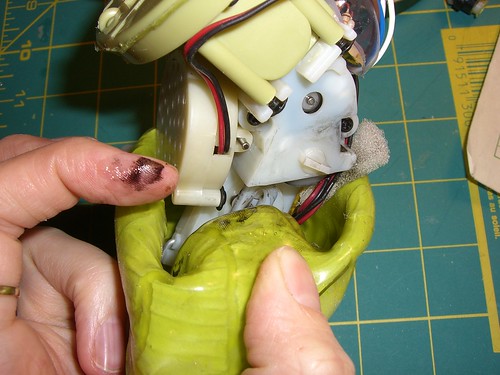

Mmm, zombie grease.

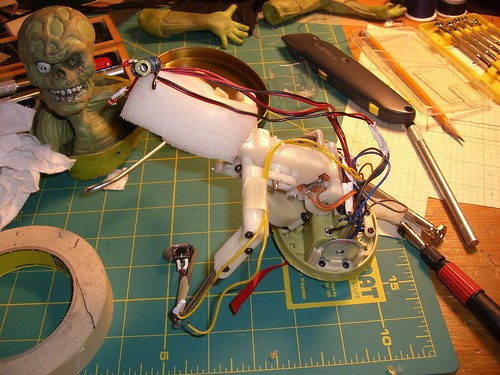
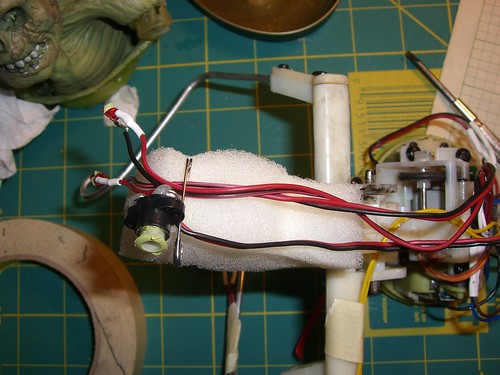
It turns out that Ed’s head was just a small block of foam with some wire inside it.

That’s right, there were no brains.

The last step was to remove the LED eyes. They were glued in place, but some firm pressure was all that I needed to pop them out, and then the entire structure and mechanism was free of the skin.


There are a lot of wires and electronic bits, protected by a thin plastic shell.


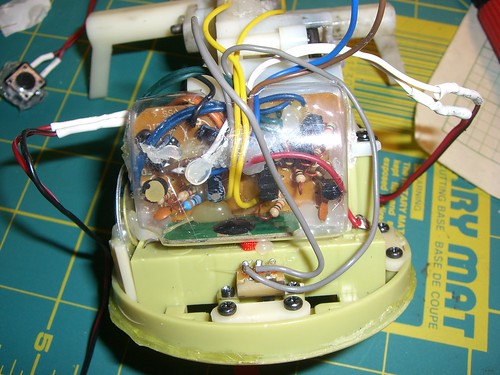
The wires are easier to see without the cover. I need to remember to replace that before I put the new skin on. Whatever that is. I haven’t quite figured it out yet.


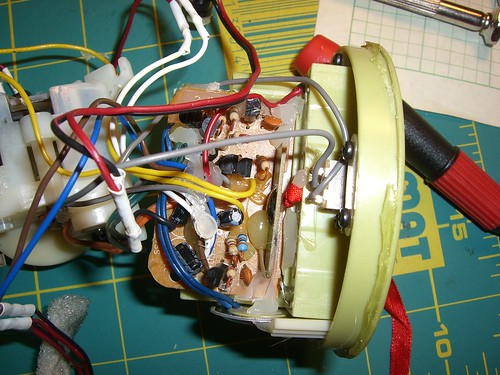
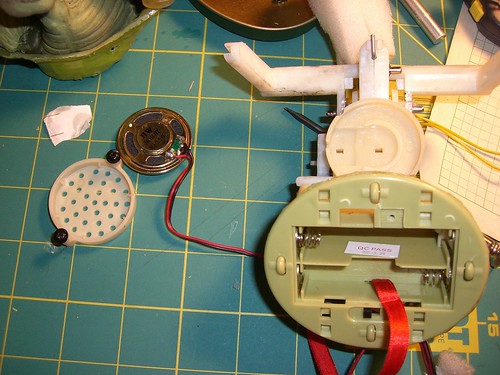
The speaker I will be disabling. Probably by careful use of a pair of diagonal pliers to the wires.


Tired of taking things apart (well, fearful, really, that any further disassembly would lead me to a state from which I could not return), I reassembled Ed, leaving the skin off.


I used a safety pin to hold the LEDs and the motion/light sensor safely on top of the head.


And here he is, in action, Dead Ed the Skinless Crawling Zombie.

What’s next? Well, I need to cut the speaker wires and create a new skin for this beastie. I have some stretchy snake-print fabric, and lots of random scraps of other potentially useful stuff.

I may also take a trip to the nearest cheap toy store and find something appropriate to cut up and attach to the existing armature.

Share

What’s been keeping me busy

Work has been fairly busy, but mostly it’s been this.

Well, not the website, the spaces that the website talks about.

I’ve been helping get the spaces ready for use; painting and cleaning and moving furniture and lots of meetings. So there have gone many of my evenings and weekends for the last 2-3 weeks.

But tonight we’re having an Open Hack session, and tomorrow (because it is the first Friday of the month) is an Open House, which hopefully will have some non-members at it who will love it and become members.

We still have a lot of work to do, especially in the large fabrication space, and there are various smaller tasks left in the Hackerspace and the Model Shop, but those two spaces are ready for use, now that they are all cleaned and painted and organized.

I’m really excited. Not so much about the Hackerspace (though it looks GREAT), because my knowledge of electronics is next to nothing, but the Model Shop. (And when it is ready, the Fab shop.) I’ve missed the shop I had access to at school, and while this isn’t quite as well equipped – yet! – it is pretty close, plus there are tools we did NOT have at school, which I am especially keen to learn about and start using.

Share

Headphone fixes; jacket to vest conversion

I have a completed project that I should post; I have lots of pictures, even!

It was a pair of headphones, with the foam ear covers completely disintegrating. I replaced the foam with fleece fabric, so they are once again wearable.

The other project is still in process, and I am not documenting it well, but I should do some of that. It was a nice fitting jacket I found at Dollar a Pound, pin-striped, with some unfortunate white stains (nail polish? paint?) on the collar and upper back, not suitable to be worn anywhere nice without removing or covering them up.

At any rate, I was looking for a vest or for a jacket I could turn into a vest. If not for the stains, I don’t know if I could have actually started to disassemble it, because it fit so well.

Well, it no longer has its sleeves, and I cut down the sides to make the arm openings a better fit for a vest. I’m going to deal with the stain on the upper back by making sewing black leather over the shoulders and upper back, and deal with the stain on the collar by putting some white lace over it. Should be an interesting combination.

Also, I screwed up the arm holes – cut them too big, they looked awful. So I am now sewing fabric back on. Argh. But it occurred to me that I could make this less obvious by adding pockets. Yes, to the sides of the garment. Why not? People have small under-arm bags and things, why not pockets.

(Also found at Dollar a Pound: a leather boys’ jacket and a brocade handbag with a neat mechanical hinge closure; I want the leather for my next Arisia costume. The body of the jacket fits me well, but the sleeves are way too short. It was a nicely lined jacket, with a second zip-in liner in addition to the sewn-in quilted liner. I am saving the linings for a potential future project. The bag I couldn’t resist because 1) mechanical closure! and 2) Dollar a Pound. Also, I need more projects.)

Share

The aesthetics of disassembly

Via Boing Boing, a set of really lovely photographs of disassembled household appliances.

While I often find the innards of objects quite lovely, I rarely manage to capture that in photos. I try to remember to photograph the things I take apart, at every step and from all angles, both to document the process and because, if I decide I -do- want to put it back together, I will not have to rely on my memory alone to remind whether this tiny ^%$#^&%$^ screw goes in -this- hole or -that- one. Especially when it’s been months since I last handled it. If I get pretty pictures, I consider that a bonus.

Share

Picture hangers – not so easy, actually

There’s a pile of unusable fluorescent light fixtures in the basement; their ballasts are dead, so they are good for nothing except scrap metal.

I thought they would be an excellent source of metal for making picture hangers, of the kind which could fit over a bookshelf, so that you can hang pictures in front of little-used books in rooms where there is NO EMPTY WALL SPACE WHATSOEVER on account of being lined entirely with bookshelves. What I want is a strip of metal about 16″ long or so, which I can bend into a square hook at one end (which will fit around the back of the shelf and keep the hanger in place) and fold into a hook shape at the other end.

I’ve been plotting this for several months, but despite it being a pretty easy-sounding project, I hadn’t actually done much more than sketch up some diagrams. Until this weekend.

I made a stab at cutting strips of metal off of the discard fluorescent fixtures with which to make over-the-shelf picture hangers.

And rediscovered that cutting lengthy strips of metal off of a larger piece is not as easy as cutting strips of cloth or paper or even chipboard, because the larger piece is – shockingly – just not so flexible! And so it gets in the way as you make progress with the shears/snips. Especially when you did not start with a flat piece, but with a piece already folded in several places to make a sort of boxy shape.

I did not succeed in getting anywhere near the 16 or so inches I need.

Conclusion: need access to appropriate power tool OR should break down and buy appropriate strips of metal already cut.

Am hoping that the impending community workspace will have such tools, because buying the material pre-cut seems like cheating, and then what I would do with this pile of ex-fixtures?? There’s plenty of good metal in them, after all, it would be a shame to throw them out.

Meta: guilt at having not worked on any projects and thus not updated blog forced me down to basement to hack at metal unsuccessfully. Also to buy more rubbing alcohol to finish cleaning tool chest. Blog may not be such a bad idea after all.

Share

To-do – more old things to fix

Figure out what to do with the box with the resistor test kit in it. Nice box, interesting old electronics, kind of a shame to separate them but the circuit boards feel . . . sticky. Like the plastic is melting or something. *dither* Can’t decide what to do.

Have a couple other old wooden boxes which need purposes. One is pretty crude; could do with the outside corners being prettied up – metal wrapped around them?

Um, that lamp base. Some kinda swing-arm dealie. Missing a bolt/screw at one joint. Also missing the lamp bits. You know, the part where you screw in a light bulb. It shall be another frankenlamp. (Another? What do you mean “another”? Well, there’s this other small lamp which is very cute but needs its lamp shade part fixed up or replaced, and I said, “Well, I could always find another lamp with an interesting head on it, and remove its head and put it on this base,” and then the engineer said, “You scare me,” and I said, “But it’s a perfectly reasonable thing to do!” and he said, “That’s why you scare me!” and I asked, trying not to grin too much, “Oh, it scares you when I’m reasonable?” So there’s another lamp that needs some fixin’.)

So I need to fix that thing so I can have a good swing arm lamp again. I even found a matching clamp with which to attach it to my desk!

Find uses for those wonderful, glorious old indicator lights. Uses that can be out of sight of the good doctor, so as not to offend his aesthetic sensibilities.

And then there’s the mysterious thing that looks like a small swing-arm lamp – sort of; it doesn’t so much swing as bend in several places – but has had both its cords CUT CRUDELY OFF and the part that used to perch at the end of the bendy arm was nowhere in evidence when I spied the base and decided I must take it.

Share

Progress on the tool chest

Saturday afternoon (no, really; this blog is choosing its dates in a way that is wrong) I hauled the chest outside and set up under the ever-watchful wisteria.

It was a nice day, except for being attacked by blood-sucking monsters (mosquitos; I won those battles. mostly) and by the blasted wisteria. I think HP Lovecraft must have been inspired by a wisteria. Nothing else with tentacles could possibly be more savage and treacherous. Every time I walked through the yard, I risked losing an eye to one of this year’s new vines.

Anyway. I set up beneath the baleful plant, smashed a few mosquitoes that had apparently been awakened by my presence (it was the middle of the afternoon! I thought those damn things were nocturnal), and got to work with rubbing alcohol and a big pile of cotton balls. And a really nice 6-in-1 paint scraper thing.

Rubbing alcohol doesn’t smell nearly as bad when you use it outdoors.

I got most of the adhesive removed, and then I ran out of alcohol. But it all went pretty quickly, faster than I had hoped, even, so it really shouldn’t be too long before I can sand down the rusted areas and repaint.

On Sunday I pruned the wisteria.

Share

Shoes

I confess that I have a weakness for shoes.

I don’t buy many pairs (really!), but that is only because I value comfort over looks, and most cute/pretty/sexy/awesome shoes hurt too much. Largely because most women’s shoes have those &^%#$$#ing HEELS on them that force your feet/legs into uncomfortable, unnatural postures. No thank you.

Flat shoes and boots are really not that easy to come by. And flat shoes or boots with a flexible, comfortable sole are really rare.

So for quite some time I have been thinking it would be really neat to have one pair of awesomely comfortable “base” shoes, with a thousand and one different tops for them. As in, today I want green corduroy, but this evening maybe something shiny and black, so I’ll just peel off the corduroy covers and stick on the leather.

I have just started to work out how shoes (normal shoes) are put together. They are impressively complicated, which is no surprise, though it is a little dismaying.

I mean, you have to start out with flat material, cut into a shape that, when curved around an odd-shaped base, with form the right kind of three-dimensional form. Feet are not a nice, regular sort of prism.

And they MOVE. Your feet flatten and widen when you step onto them, plus they bend. This makes constructing a container for them kind of tricky, when said container is made of anything stiffer and less stretchy than knitting.

I have a pair of very pretty, sequined and beaded slip-ons. They’re too small; it hurts to put them on for even a few seconds, despite the fact that they are actually my size (lies, all LIES I tell you!). However, they are very, very simple in construction, so they seem like an excellent way to get started with patterns.

Except that the sole is almost perfectly symmetrical. And are feet symmetrical?

No, they are not.

So transferring the vamp (that’s the bit that wraps around the front of your foot) and the heel patterns to a sole that more closely resembles a real foot, that doesn’t work so well. You wind up with an unattractive bulge over your foot.

While searching for shoe making patterns, I found this post, which had one pattern that looks like it might work for my purposes, more or less. Haven’t tried it out yet, as I am still fighting with the sparkly shoe pattern as well as one I made up.

As for the other tricky part of this project, I haven’t done more than start thinking of ways the shoe covers might fit to the base.

Share

Tool chest renovation

I recently acquired an old Craftsman tool chest. A small one, with small drawers for small tools. All the drawers were lined with felt. A lot of the felt was pretty worn in spots, down to the metal, and the top most part of the chest had been visited by rodents, so there was that kind of mess, too. Plus, the outside of the case has some large rust patches.

So the whole thing is really in need of a good sanding and repainting, plus felt removal and replacement.

It turns out rubbing alcohol does a number on the adhesive used to glue the felt down.

It also turns out that that quantity of rubbing alcohol should NOT be used in a closed, poorly ventilated basement, so I shall be taking the tool chest OUTSIDE to remove the remaining 95% of adhesive and felt (most of the felt came up pretty easily when I pried the edges loose and pulled).

I haven’t quite decided what to do about repainting the tool chest. On the one hand, I like the old paint, because I like the way old stuff looks. But it’s not in good enough condition to leave as-is. I don’t want it to keep rusting, nor do I want rust to get all over me/other things.

I’ve been toying with the idea of painting it all black, or blue, and then painting a viney jungley sort of scene all over the outside, with trees and flowers and screeching birds and that sort of thing.

I’m also pondering giving it a coat of primer, and then covering it with interesting paper or fabric.

It’s a surprisingly heavy thing for its size. When I first decided that yes, I did want to take it, I removed most of the contents, hoping that would make it a little easier to haul away. It did not. So it might be kind of amusing to put fabric on the outside, because of the contrast between the softness and lightness of fabric, and actual heaviness of the metal.

Upholstered tool chest? Sure, why not.

Share

To-do list

Feather fan. Not the handheld kind, the kind attached to a motor powered by a USB connection.

Bristlebots! With feathers, of course, and those used toothbrush heads I should admit I am never going to mail back to the manufacturer for recycling.

Repair the original mask.

Make the original mask useable by itself again (needs a strap to go around my head), rather than only useable by attaching it to the headpiece.

Brackets for hanging framed pictures from the bookshelves.
– use the metal from ex-fluorescent fixtures

Share