Post-Arisa post

So I had a table in the Arisia Art Show! And that was exciting. Also cold. Really really cold. Fortunately, I only had to be there to set it up and take it down again, but that was quite enough freezing every bit of exposed skin (hands, face) for one weekend.

I sold 3 pairs of earrings and 1 ear cuff, and that was also exciting. And not cold at all.

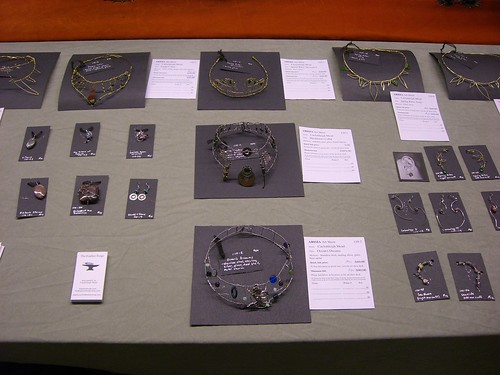
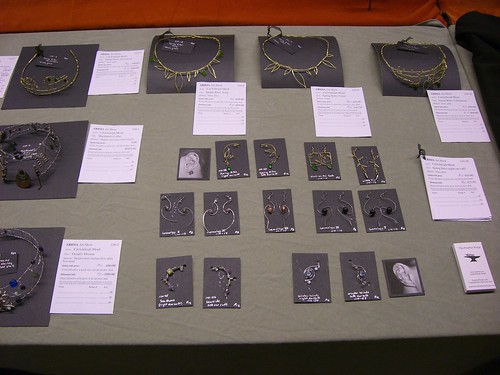
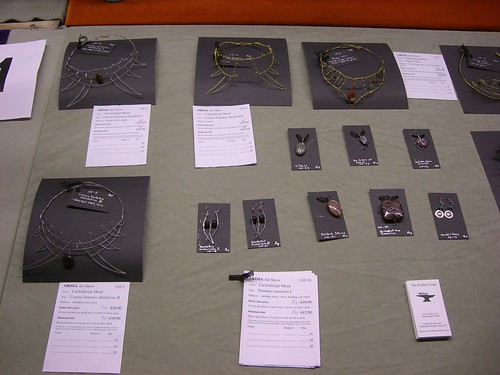
I think I may have worked out a reasonable table setup, assuming I don’t have many, many pendants and pairs of earrings and ear cuffs, because if I did, I’d have to work out some kind of more vertical setup.

Left end of the Arisia table

Middle of the Arisia table

Right end of the Arisia table

Elsewhere at the con (Fabric Dragon), I acquired several strands of lovely beads, including some small sodalite spheres that I think will work well for more of the “Cosmology” type earrings, and some gorgeous cylindrical fluorite beads (a gift, though from the same source).

I also bought a pair of fingerless gloves, made of bubble silk, which are pretty much the best thing ever.

My intention, when I visited Reyen Design Studios, was to buy a skirt, because I wanted to last year and didn’t quite feel up to spending the money then.

But they had these fingerless gloves made of this weird puckered silk, and I tried them on, and thought about how miserably cold my wrists and hands are at work all. the. time, either because there is cold air blowing on me all. the. time, or because my wrist is resting on the surface of the desk, and even a layer of shirt – or two! – is not enough to shield me from absorbing the coldness of the desk and making my arm hurt.

I ended up with one of the long pairs, in shades of deep and bright green. I figured they would give me ample wrist and hand coverage, and covering the rest of my forearms couldn’t be a bad thing, right? Also, they are the right shades of green to go with my silly green ball gown, which is completely sleeveless.

It took a few days post-con to remember to take them to work, but I am now convinced I need a couple more pairs, in other colors. Not that the green doesn’t work reasonably well with most of my wardrobe, but, well. Black would go with everything, and if I could get some in some shades of brown/beige/gold/brick red or something, I would be all set.

Anyway, they are awesome. Very comfortable, shield the tops of my hands from the evil cold breeze, and my wrists, and provide another barrier between my arm and the cold desk surface.

I did also buy a skirt. Not in the shades of green or blue or greyish purple that I expected (and there was a really lovely purpley grey skirt, all the shades of the evening), but one with a primarily orange layer and a primarily red layer. It looks like a fire.

All in all, it was a good con, except for the frigid temperatures in some of the public spaces, and I will likely do more art shows.

Share

Process and progress

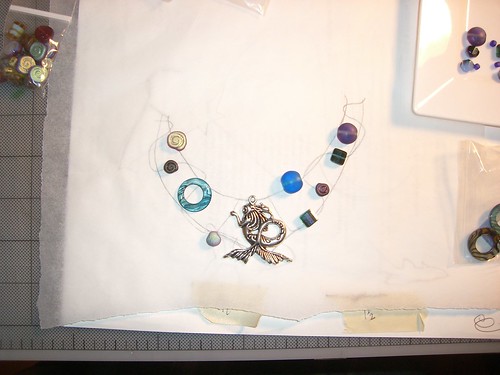
Back in September, I was playing around with a bunch of sea-themed beads. I had this really amazing large mermaid charm/pendant, but I couldn’t quite see her as just a pendant. Or even as just a pendant with a lot of interesting supporting beads and wire around.

I thought the centerpiece of an elaborate necklace would be nice, so I did a crude sketch and laid out some beads in a way that seemed reasonable:

A large metal mermaid charm with some beads arranged on a sketch of a necklace design.

This is more or less how I design necklaces: sketch out what I think the structure will be, put beads down on it, then photograph.

I didn’t quite feel like making it then. Or maybe I was really busy. Or both. But periodically I remembered (like when I was pawing through beads, and be reminded there was this piece lurking, completely unfinished), and I’d want to get back to it.

Well, what with Arisia coming up, I have suddenly felt spurred to action!

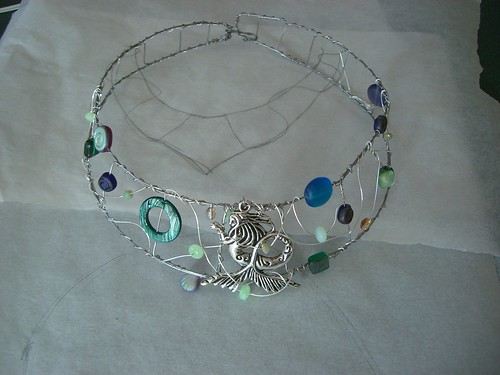
Tragically, I took no more in-process photos, but here is the completed piece:

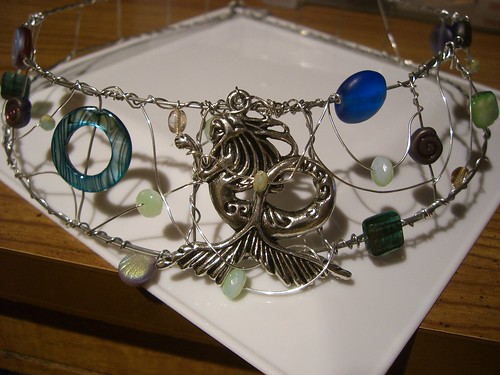
Completed collar. Necklace. Whatever.

The structure is, as usual, stainless steel, in three different gauges. The swoopy, wave-like wires are sterling silver. HOLY COW, is silver wire easy to bend! After spending quite some time forcing the stainless steel (and it is a soft temper steel!) to do what I wanted, the sterling felt like putty. Wow. So nice.

Components are: big metal mermaid charm/pendant, lots of different glass beads, and a couple of pieces of dyed shell. The circle that the mermaid is facing is dyed shell, and there’s a chunky green rectangular bead on the other side that is also shell.

I put one of the pale green beads behind her head to make her face stand out a little more.

This was the most painful piece I’ve done. I am used to my finger pads feeling tender after bending a lot of stainless steel, and I occasionally wind up with minor stab and scratch wounds from unfiled wire ends. But working on it last night, I managed an impressive puncture wound as well as an embarrassing incident with the flush cut pliers. (Embarrassing because seriously, it isn’t that hard to keep the soft bits away from the sharp parts of tools!)

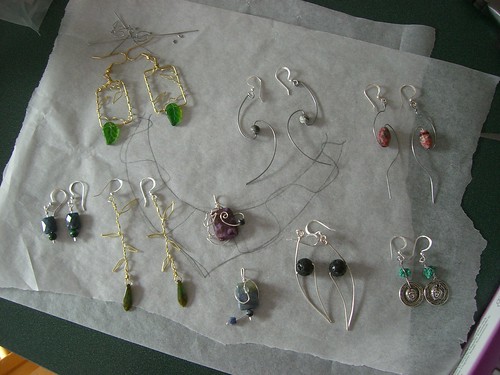
In other news, I made a bunch of earrings, and a couple more pendants. I am liking this productivity!

THe usual sorts of things: brass wire, sterling silver wire, stainless steel; glass and stone beads.

Still to do for Arisia: title all of these things. And the other things. And submit all that plus size info and pricing. And work out table layout; I think I am NOT going to use slabs of rock this time, because it is heavy to carry around! And I do not have enough slabs for every necklace anyway.

I do have a chunk of a tree branch. Maybe I can hang things off that.

Share

How to make a Borg faerie

At long last, I took some pictures of the costume components. I haven’t been able to track down my stunt double to get photos of someone wearing it all (and haven’t gotten the photos taken at Arisia yet, either), but this is more or less how it all looked when put together:

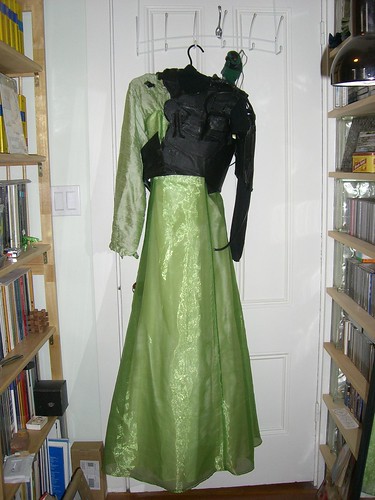
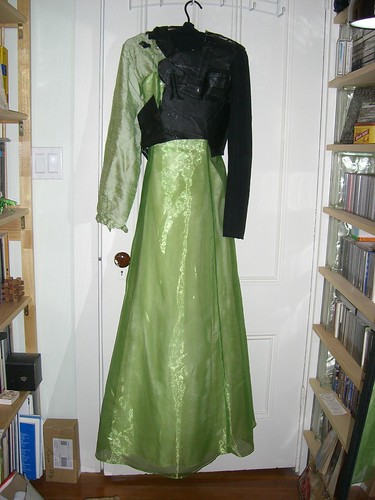
Green dress + black Borg parts + Borg parrot

The various pieces:

Feather ears and false eyelashes

The eyelashes were purchased at Boston Costume, which also had false eyelashes made from real feathers, but they were brown, and not quite as immensely long and swoopy. Moving on:

Borg torso piece

I reused parts of last year’s Borg pirate. Here you can see that the structure of this piece is cardboard from a cereal box (or maybe that’s an oatmeal box; I used a variety). You can also see that it won’t hang straight down, on account of having hardly any material on the right side. Oh, gravity, why must you ruin my pictures?? Next:

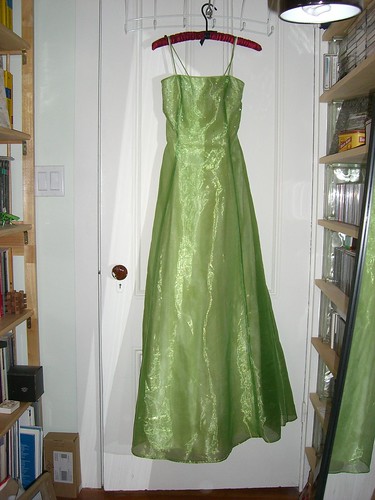
Shiny green prom dress

This came from the Garment District during one of their wonderful “50% off everything” sales. I would totally have paid the full $16 for it! I don’t have many excuses to wear it, but fortunately I came up with the idea to combine it with the Borg pieces. Now I need more ideas. But that’s not all:

Green half-shirt over black turtleneck

I had to wear a black turtleneck for the Borg part, but I didn’t want my right arm all black, and I like that turtleneck a lot so I didn’t want to cut it up. I went hunting for a cheap source of appropriate green material, and found a nice little green skirt in a thrift store which got turned it into just enough shirt to cover my right arm and chest. I left the rip there intentionally; being partially assimilated can leave a mark, you know!

Shirt layered under dress, with Borg part over everything

The main parts of the costume layered properly. I then added a Borg piece to my upper arm, plus Frankie, plus a black glove. I didn’t worry about my shoes, because the dress is so long (I did wear my favorite black boots, which are more Borgish than Faerieish). Maybe some day I will get some real photos, showing all the pieces together. I haven’t actually seen them myself.

The story I gave people about my costume was that the Borg tried to assimilate Faery, but their technology had a difficult time coping with a magic-based world, and so they weren’t very successful. (This gave me cover for not wearing a Borg eyepiece or other head covering; I tested out the look of wearing last year’s eye piece with the costume, and didn’t like it. Also rejected: wearing the feather headpiece from many years ago. The faerie effect was best with my hair all down, with just the feather ears and eyelashes, and some gold lipstick.)

Share

Arisia costume 2010: False eyelashes are stabby, and other lessons learned

So the costume ended up being “the Borg tried to assimilate Faery” and was made up of green prom dress + Borg torso and arm pieces + green shirt (for the non-Borg arm/shoulder + feather ears + long green false eyelashes. And some sparkly things in my hair. Also: gold lipstick on Saturday (silver on Sunday, which I liked much less).

Lessons:

1) If you do not get the inner ends of the false eyelashes stuck down really, really well, they will curl up and stab your upper eyelids every. time. you. blink. And sometimes when you aren’t blinking. Two days after, I found I had flaky skin on my upper eyelids – scabs, apparently, from the repeated stabbings, which happened because I put the eyelash glue in the bag that I put in the coat check and thus didn’t want to try to retrieve.

2) Carry the damn eyelash glue WITH YOU.

3) Strands of beads hanging in your hair are heavy and will pull the hairclips to which they are attached down towards the floor. This hurts. Also hurting? When hair gets wrapped around the beads in stupid ways.

4) The wire hooks on the ears were a little too tight on the first day. And needed adjusting to a more comfortable position much sooner than the end of the day.

5) Wearing a turtleneck + dress + cardboard and leather thing over your chest makes for some overheating. That Borg element needs some sort of ventilation. Pushing up my sleeves did help a lot; also, I could have not worn pants, because hello, wearing a dress. Which completely covered the pants AND the really long socks. (could have worn short socks, too, instead of the really long, almost tights, socks that I went with)

6) The flashy eyelashes were really quite popular. I think I got about as many compliments on them as on the feather ears or the overall look. (I thought they looked really weird.) And other than the STAB STAB STABBING, they were pretty comfortable.

I was complimented by one woman on how “subtle” the look was.

“Subtle?!” They were BRIGHT GREEN! And enormously long! YOU COULD NOT MISS THEM!!!

“Well, yes,” she said, “Compared to putting on a whole bunch of make up.”

Hmm, well, okay.

And some awesome things:

The layers kept me warm in rooms that I would have normally been freezing in.

Got to show off the construction of the ears to several people, including a couple of people who I sent the Flickr link to because they seemed particularly interested in it.

Noticed by the hall costume awards people. Twice, even! I was found late on Sunday by one of the people doing hall awards, who wanted to make sure I got one (which I already had earlier that day).

Person at a party who blurted out, “I’m sorry, I can’t stop staring at you, but you’re just so pretty!” (She was one of the people I sent a link to later.) I know that dress looks good on me, but the eyelashes were just so weird.

Share

It must be nearly Arisia

How do I know? Because suddenly I feel like I must spend every available minute working on a costume, because I put off working on it until um about a week ago (granted, I didn’t have a good idea until about TWO weeks ago).

Anyway.

(I am feeling lazy and will therefore not be putting images right in the post. Maybe later.)

It involves feathered ear things, because it’s been way too long since I made anything with feathers, and at this point I have enough feathers to build an entire flock of over-energetic birds, so I need to do something useful with them. (More birds == bad idea. Two is quite enough, especially when they decide to get a look at what I am doing. A really, really close look. And then get cranky and territorial and possessive about the thing in your hand that they want to chew on and carry away.)

One of the things on my mental to do list was to work out interesting wire ear cuffs, and finally, last month, I did just that! And the results are pretty neat, though I need to make myself another of the spiffy moonstone ones, because the first one went to someone as a gift.

The basic structure works out very well to support much more elaborate structures than mere beads. Not that feathers are such a weighty structure; the feather ear things are very light (SHOCKING I KNOW) and pretty comfortable.

Share

Belated post-mortem on the Borg pirate

I really should have written this up right away after Arisia, so that I would have good notes on What Not to Do for a future iteration of the costume. Assuming there will be another. Which there might. Or at least there might be a future prosthetic arm, perhaps in a steampunk style rather than Borg.

So.

Cables: A cable that runs from the forearm all the way to the chest is Not Good. It meant I had to take off the upper arm piece, and disconnect the cable from the battery pack, in order to remove the forearm. Having a cable that can plug in at either the battery OR the forearm would be much better. I think having the cable attached to the upper arm, and then running from that in both directions, would work much better. (Or, put the power source for the arm activator -in- the arm, and reduce the number of cables. Though in this case, more cables was good, because Borg have lots of cables dripping off them.)

Arm activator: The pager motor worked fairly well for something thrown together in the last couple nights. But something that did something more interesting than spinning around and going VVVRRRRRR! would be nice. Something that moved in a grabby sort of manner, perhaps?

Weight: The leg was heavy. Actually, it was the foot that was heavy. The Borg foot (which just fit right over a normal boot, like an immense spat) was heavy and made walking difficult. For the future, making a foot/lower leg assembly out of paper mache, and then covering that with leather, would be better than chopping up a heavy pair of rubber boots and sticking them together with duct tape.

Leg awkwardness: The upper and lower parts of the leg armor got hung up on each other at times and made walking a bit tricky. And stairs VERY tricky (esp. with the big, heavy foot). Adding some hinge-looking bits to the outer knee would have been a nice touch aesthetically. The cable ends came loose a number of times, too.

Cable attachments: Cables were firmly fixed at one end with duct tape (or Gorilla tape), but shoved into a loop of tape/leather at the other. Some of the cable ends stayed in place pretty well with that arrangement, but a lot of the leg cables pulled out of their tape/leather end. Should look for some sort of easy-release clip or something. Perhaps some sort of clip that is designed for cables/tubing – which could be hidden inside a leather shell so that it doesn’t look like audio cable, but like it penetrates into my body. The cable that I wanted to run from my head to my torso didn’t work at all because I didn’t have a good way to keep the body end of it from pulling free.

More fiddly bits: Could have done with more LEDs and mechanical pieces. Matter of time, by which I mean I should have started more like 6 weeks, minimum, in advance instead of 4. Tritium keyring things would be a great way to get a nice glow without having to worry about a power source.

Eye prosthesis: It looked great, was pretty comfortable, and the visibility wasn’t terrible (though I really missed having peripheral vision on that side!). However, it would have been great fun if I’d had it hooked up to the shutter thingy. I need a longer remote shutter release for that, and a good way to connect that cable to the headpiece and the rest of the body armor, so that it will stay in place, and not be too likely to get hung up on things in the environment. Perhaps adding some LEDs to that (which I could turn on and off – don’t want them on ALL the time, thank you), or an other layer of lenses or something that could be rotated into place from time to time . . . So many possibly variations and so little time!

The pirate bits worked pretty well. The kerchief was unbelievably slippery and I had to clip it to my hair, and the shredded shoulder made it a real pain to get Frankie attached to my shoulder cables, but since I probably won’t redo the pirate part (or even the pirate Borg combo), that’s not something I’m much worried about.

People pretty well “got” the pirate aspect of the costume. I think. I heard several comments like, “Oh, there’s someone doing that steampunk/cyberpunk combo” or just plain “steampunk;” about as many people understood that I was (partially) a Borg as did NOT understand, but whether that was due to lack of familiarity on their part with Star Trek, or due to my failure to make something that was obviously Borg, I do not know. I got a lot of compliments, it was fun to make and fun too wear, and not too terribly tiring (though a day and a half was a bit long, see:weight issues), and really that was the point.

I need to get a bunch of photos of the pieces, since I didn’t document the process well (too busy building to stop and photograph), after which this will all make more sense to people who are not me.

Share

Headphone fixes; jacket to vest conversion

I have a completed project that I should post; I have lots of pictures, even!

It was a pair of headphones, with the foam ear covers completely disintegrating. I replaced the foam with fleece fabric, so they are once again wearable.

The other project is still in process, and I am not documenting it well, but I should do some of that. It was a nice fitting jacket I found at Dollar a Pound, pin-striped, with some unfortunate white stains (nail polish? paint?) on the collar and upper back, not suitable to be worn anywhere nice without removing or covering them up.

At any rate, I was looking for a vest or for a jacket I could turn into a vest. If not for the stains, I don’t know if I could have actually started to disassemble it, because it fit so well.

Well, it no longer has its sleeves, and I cut down the sides to make the arm openings a better fit for a vest. I’m going to deal with the stain on the upper back by making sewing black leather over the shoulders and upper back, and deal with the stain on the collar by putting some white lace over it. Should be an interesting combination.

Also, I screwed up the arm holes – cut them too big, they looked awful. So I am now sewing fabric back on. Argh. But it occurred to me that I could make this less obvious by adding pockets. Yes, to the sides of the garment. Why not? People have small under-arm bags and things, why not pockets.

(Also found at Dollar a Pound: a leather boys’ jacket and a brocade handbag with a neat mechanical hinge closure; I want the leather for my next Arisia costume. The body of the jacket fits me well, but the sleeves are way too short. It was a nicely lined jacket, with a second zip-in liner in addition to the sewn-in quilted liner. I am saving the linings for a potential future project. The bag I couldn’t resist because 1) mechanical closure! and 2) Dollar a Pound. Also, I need more projects.)

Share