The world’s ugliest lightbox

I’m not a very proficient photographer, and I don’t have a lot of patience for fiddling with the various settings on my camera to get perfect results, so when I saw some easy instructions for how to build your own lightbox, I made a mental note of it. I figured someday it might be a useful thing to know how to do, if I had small objects I wanted to make some effort to photograph nicely. I know I can always adjust things in Photoshop later, but I’d rather not have to add that step to the process.

Since I started making more jewelry, I’ve become even more bothered by the crappy pictures I’ve been getting under inferior artificial light, so a week or so ago, I looked up the “How to build a lightbox” instructions, and built my own last night.

Here is one such tutorial via Strobist.

Here is another using fabric instead of trace or tissue paper.

Google provides a variety of other alternatives; I saw another one built out of foam core, with solid walls; illumination is provided by clamping lights to the front walls and aiming them into the box (instead of lighting the exterior, and diffusing the light with trace paper or fabric).

Here’s my version:

Lightbox built from binder clips and used Priority Mail boxes

One clip-on lamp + one ugly old saved-from-a-basement lamp = my light sources.

It’s made from two Priority Mail boxes, with trace paper covering the cut-outs in the sides and top. I use binder clips to hold the two pieces together. I cut the top so I can lift a flap of paper out of the way and take photos from above my subject; it is generally held (mostly) in place with tape.

Yeah, it’s ugly, and it probably took longer to make than if I’d started with a single box of the right size. And there are gaps where there technically shouldn’t be. BUT it can be taken apart and stored flat, so it takes up very little space!

Here are some pictures I took to test it all out:

Testing white balance

Not too shabby.

Another white balance test

Also not bad. If only I'd made notes about what the camera settings were.

Overhead picture

I cut a hole in the trace paper on the box top so I could take overhead pictures.

Flash!

Flash! A bit too yellow.

One of my current light sources is a fluorescent bulb, which is not really as bright as I’d like; this will be an easy fix (in fact now that I think about it, I think I might have a nice incandescent stored in a large yogurt container on the little table next to the window). Usually I only use that light, clipped to a bookcase, to provide additional light when I need to use my big mirror. It turns out the clip part of it balances very well when placed on the desk, so the lamp can be a desk lamp without needing to be clipped to the edge of the desk! Nice design, that.

I do want to get a large sheet of white paper to cover the back and create the bottom of the light box; the cutting mat and brown cardboard are not particularly nice.

I originally thought about making a teeny tiny lightbox out of a kleenex box, but it’s easier to put different backdrops and props into the bigger box. (I may make a tiny one anyway, because it would be fun and cute.)

Share

Pondering colors and seasons

Ignoring all the wires that have some sort of enamel coating to give them color (and also ignoring fancy metals like niobium and titanium, which can be turned pretty colors through exciting electrical processes), metal wire doesn’t come in very many different colors. Really only 3 dramatically different colors (reddish yellow being awfully close to either yellow – brass – or copper – rose gold).

There’s silver: silver, steel (stainless or galvanized), aluminum

There’s yellow: brass, gold, bronze

There’s reddish yellow: brass (sometimes), gold

There’s reddish brown: copper

I’ve been thinking about colors evocative of the seasons, and winter is easy: silver, accented with blue, grey, white, silver, mauve. Maybe some other very pale pinks and blues and purples: I see those in the cloudy winter sky.

Fall is also super easy: copper or yellow metal, accented with red, yellow, orange, brown. Maybe a little purple. (Why purple? I don’t know. It just seems right.) Maybe some dark green.

Spring is a little tricky, actually. Should it be silver accented with green? (And/or some early spring blossom colors, which tend to yellows and purples and blues, though of course tulips are any color you want.) Or yellow accented with green? Then what happens with summer? Because summer is where I get really stuck. Maybe summer should be yellow with green. But there are lots of different colors of flowers in the summer. So I don’t know. Light green for spring, dark green for summer?

Share

Weekend summary: pigeon bead necklace done and other things in progress

Helpful hint: Misplacing your prototypes is not a good idea. Forgetting which opaque container they’ve been stored in counts as “misplacing.” (And of course the container was literally right in front of me.)

This among other things has emphasized the importance of getting some better storage going for the beads and jewelry stuff and small tools and etc. etc. I think the old metal tool chest is going to be my jewelry/small tool storage, so now that I know what it will be good for, I have even more reason to get back to that project.

And now I see I haven’t uploaded any photos of the tool chest. After some extensive searching, it appears that is because I hadn’t taken any pictures. I could have sworn I did!  Well, I do now:

Old tool chest

Needs some work.

(Things needing doing to the chest: finishing cleaning out drawers. Reline with felt? felt over cardboard? velveteen? Possibly repaint the exterior. Would delay getting it into useful state, because it would be better to paint before putting in nice new lining. Unless the lining was easy to remove; see: gluing the fabric to thin cardstock so the liners could be lifted out intact. I’d have to sand it all down before painting, and working around the drawer pulls and the decorative bits would be a real pain; ditto painting around them. But it would be really pretty; I’m imagining a rich metallic green.)

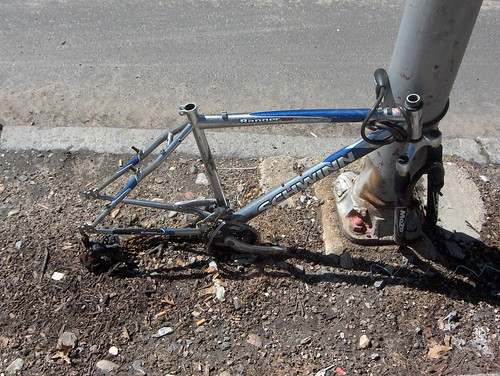
Speaking of photos languishing, I have finally finished uploading all my abused/abandoned bicycle pics, including a few brand spankin’ new ones (but mostly they are old ones, the pictures I first took when I started collecting them). This is the first photo of the latest uploads; go forward from there.

Bicycle without wheels, seat, or handlebars, sinking into the ground.

One of my favorite ruins: Bicycle without wheels, seat, or handlebars, sinking into the ground.

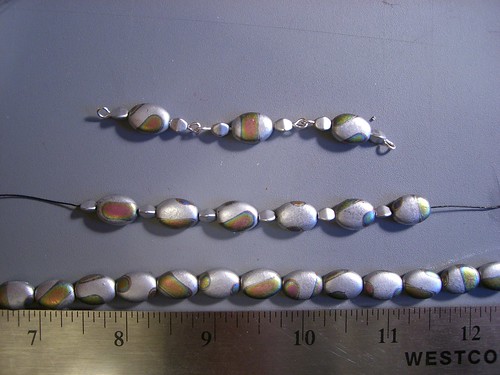
Finished remaking the pigeon bead necklace – after comparing different looks, I went with the metal link style:

Comparing beads on a string to beads on wire

Comparing two different arrangements of beads on a string to beads on wire

Completed pigeon bead necklace

The finished pigeon bead necklace.

I also made some good attempts at some new styles of ear cuffs, and made a couple of jigs to try and make some of the shaping easier. It turns out that, in at least one case, the jig is actually not that helpful. What was really useful was to carefully wrap some string along the curves of the ear cuff, and mark the string at each place the wire bends. Then lay the string out straight, transfer the marks to paper, and note what each mark means.

When it came to trying to duplicate the shapes, it was much easier to hold a length of wire against that straight template, and grab the wire with my pliers at the given places. Since I ended up doing a couple of variations on this particular pattern, the template came in even handier than the jig, since the template made it easier to place some of the shapes at different places along the curve of the ear cuff. This would all make more sense with pictures, I know, but I’m not done yet, and it really deserves an entire post of documentation on its own.

A few of my fingers are rather sore from bending wire. They can do things my pliers can’t, and sometimes I have pliers in one hand, holding the wire firmly, and I need to shape it. I suppose if I spend enough time doing this, I’ll build up calluses. Or figure out how to do things with other tools, not my fingers!

Also: I was thinking about how to document some of my other techniques, and thinking about how much time it takes to take photos of every step, and write out text to explain every step, I realized I do actually have the technology to record video. And that might be better than still images and text. Setting up the camera to get a good look at what I am doing may be a bit tricky, though; I would like to set it so that the point of view is the same as MY point of view, which means the camera would probably have to be between me and my hands. Could be awkward. We shall see; now that I’ve thought about it, I want to do it. If nothing else, I need to know how it will work!

Another to-do, needing doing since I moved from blogspot to this site: figuring out which tags need to be converted into categories, and properly categorizing the old posts.

Share

Pretty beads

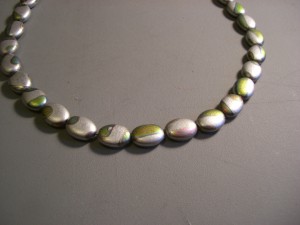
I saw these lovely glass beads in one of the local craft stores (Playtime in Arlington).

Silver beads with oil rainbow colors

Pretty pretty beads, with colors like an oil rainbow.

I kept thinking about them as “peacock beads,” because of the sort of eye shape of the color splotches, and the rainbow look of the colors, even though they aren’t peacock colors at all. Depending on the angle of the light, some of the colors are either pink OR green. Iridescence! Awesome.

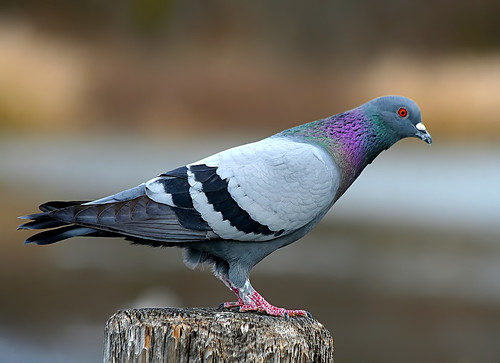
Then I was waiting for a bus yesterday, watching what was going on around me, and realized what bird they really resemble:

Pigeon

Pigeon (aka rock dove) picture from flickr user TexasEagle

Browsing Flickr to find pigeon pictures, because I have none, I found an even more accurate color comparison:

Nicobar pigeon

Nicobar pigeon picture from Flickr user ucumari

Originally, I made a really simple necklace by just string the beads together on some black cord, but I’m not completely fond of it. The beads kind of swivel around when I wear it, and I think they will look better with some sort of spacer. I found something appropriate, but haven’t rebuilt the necklace yet (also I am torn between a simple beads-on-cord approach, or threading the beads on wire, and linking wired beads together).

Simple necklace of grey "pigeon" beads

Simple necklace is kind of boring, even if the beads are really pretty.

Share

How to make a Borg faerie

At long last, I took some pictures of the costume components. I haven’t been able to track down my stunt double to get photos of someone wearing it all (and haven’t gotten the photos taken at Arisia yet, either), but this is more or less how it all looked when put together:

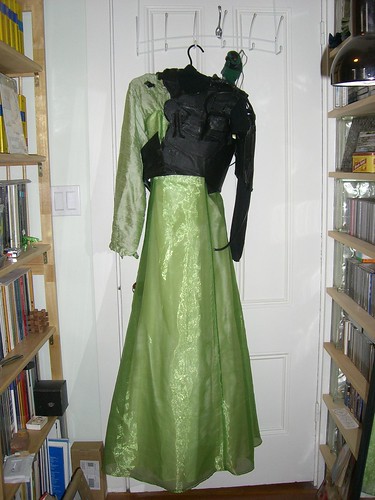
Green dress + black Borg parts + Borg parrot

The various pieces:

Feather ears and false eyelashes

The eyelashes were purchased at Boston Costume, which also had false eyelashes made from real feathers, but they were brown, and not quite as immensely long and swoopy. Moving on:

Borg torso piece

I reused parts of last year’s Borg pirate. Here you can see that the structure of this piece is cardboard from a cereal box (or maybe that’s an oatmeal box; I used a variety). You can also see that it won’t hang straight down, on account of having hardly any material on the right side. Oh, gravity, why must you ruin my pictures?? Next:

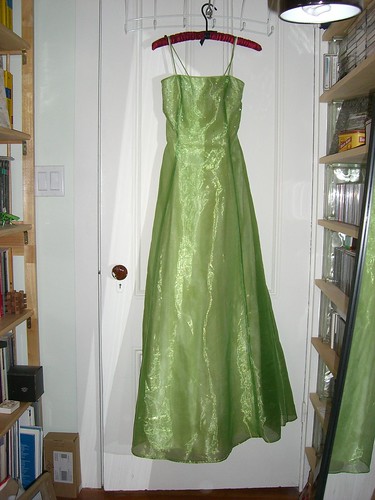
Shiny green prom dress

This came from the Garment District during one of their wonderful “50% off everything” sales. I would totally have paid the full $16 for it! I don’t have many excuses to wear it, but fortunately I came up with the idea to combine it with the Borg pieces. Now I need more ideas. But that’s not all:

Green half-shirt over black turtleneck

I had to wear a black turtleneck for the Borg part, but I didn’t want my right arm all black, and I like that turtleneck a lot so I didn’t want to cut it up. I went hunting for a cheap source of appropriate green material, and found a nice little green skirt in a thrift store which got turned it into just enough shirt to cover my right arm and chest. I left the rip there intentionally; being partially assimilated can leave a mark, you know!

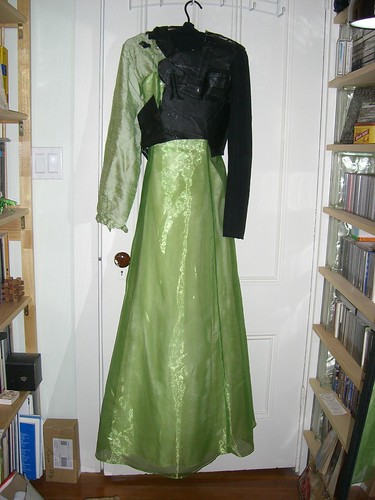
Shirt layered under dress, with Borg part over everything

The main parts of the costume layered properly. I then added a Borg piece to my upper arm, plus Frankie, plus a black glove. I didn’t worry about my shoes, because the dress is so long (I did wear my favorite black boots, which are more Borgish than Faerieish). Maybe some day I will get some real photos, showing all the pieces together. I haven’t actually seen them myself.

The story I gave people about my costume was that the Borg tried to assimilate Faery, but their technology had a difficult time coping with a magic-based world, and so they weren’t very successful. (This gave me cover for not wearing a Borg eyepiece or other head covering; I tested out the look of wearing last year’s eye piece with the costume, and didn’t like it. Also rejected: wearing the feather headpiece from many years ago. The faerie effect was best with my hair all down, with just the feather ears and eyelashes, and some gold lipstick.)

Share

Arisia costume 2010: False eyelashes are stabby, and other lessons learned

So the costume ended up being “the Borg tried to assimilate Faery” and was made up of green prom dress + Borg torso and arm pieces + green shirt (for the non-Borg arm/shoulder + feather ears + long green false eyelashes. And some sparkly things in my hair. Also: gold lipstick on Saturday (silver on Sunday, which I liked much less).

Lessons:

1) If you do not get the inner ends of the false eyelashes stuck down really, really well, they will curl up and stab your upper eyelids every. time. you. blink. And sometimes when you aren’t blinking. Two days after, I found I had flaky skin on my upper eyelids – scabs, apparently, from the repeated stabbings, which happened because I put the eyelash glue in the bag that I put in the coat check and thus didn’t want to try to retrieve.

2) Carry the damn eyelash glue WITH YOU.

3) Strands of beads hanging in your hair are heavy and will pull the hairclips to which they are attached down towards the floor. This hurts. Also hurting? When hair gets wrapped around the beads in stupid ways.

4) The wire hooks on the ears were a little too tight on the first day. And needed adjusting to a more comfortable position much sooner than the end of the day.

5) Wearing a turtleneck + dress + cardboard and leather thing over your chest makes for some overheating. That Borg element needs some sort of ventilation. Pushing up my sleeves did help a lot; also, I could have not worn pants, because hello, wearing a dress. Which completely covered the pants AND the really long socks. (could have worn short socks, too, instead of the really long, almost tights, socks that I went with)

6) The flashy eyelashes were really quite popular. I think I got about as many compliments on them as on the feather ears or the overall look. (I thought they looked really weird.) And other than the STAB STAB STABBING, they were pretty comfortable.

I was complimented by one woman on how “subtle” the look was.

“Subtle?!” They were BRIGHT GREEN! And enormously long! YOU COULD NOT MISS THEM!!!

“Well, yes,” she said, “Compared to putting on a whole bunch of make up.”

Hmm, well, okay.

And some awesome things:

The layers kept me warm in rooms that I would have normally been freezing in.

Got to show off the construction of the ears to several people, including a couple of people who I sent the Flickr link to because they seemed particularly interested in it.

Noticed by the hall costume awards people. Twice, even! I was found late on Sunday by one of the people doing hall awards, who wanted to make sure I got one (which I already had earlier that day).

Person at a party who blurted out, “I’m sorry, I can’t stop staring at you, but you’re just so pretty!” (She was one of the people I sent a link to later.) I know that dress looks good on me, but the eyelashes were just so weird.

Share

It must be nearly Arisia

How do I know? Because suddenly I feel like I must spend every available minute working on a costume, because I put off working on it until um about a week ago (granted, I didn’t have a good idea until about TWO weeks ago).

Anyway.

(I am feeling lazy and will therefore not be putting images right in the post. Maybe later.)

It involves feathered ear things, because it’s been way too long since I made anything with feathers, and at this point I have enough feathers to build an entire flock of over-energetic birds, so I need to do something useful with them. (More birds == bad idea. Two is quite enough, especially when they decide to get a look at what I am doing. A really, really close look. And then get cranky and territorial and possessive about the thing in your hand that they want to chew on and carry away.)

One of the things on my mental to do list was to work out interesting wire ear cuffs, and finally, last month, I did just that! And the results are pretty neat, though I need to make myself another of the spiffy moonstone ones, because the first one went to someone as a gift.

The basic structure works out very well to support much more elaborate structures than mere beads. Not that feathers are such a weighty structure; the feather ear things are very light (SHOCKING I KNOW) and pretty comfortable.

Share

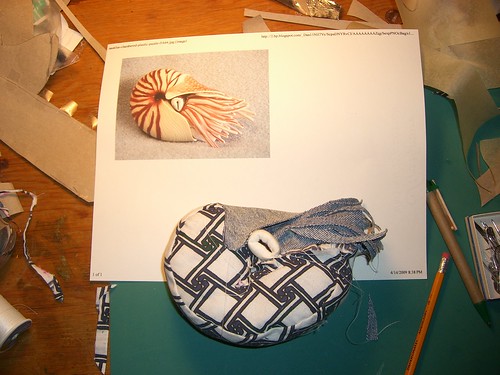
Prototype nautilus


Prototype nautilus, originally uploaded by jfeathersmith.

About 3 hours of work to get to this point. I sewed my finger to it once, and then almost did a second time (hand sewing, and the needle/thread only passed through the uppermost layer of skin, but it felt rather weird).

First time posting using Flickr’s “blog this” option; let’s see how it works.

ETA: Hmm, well that’s rather convenient for posts containing just one picture. Except I still have to add tags via Blogger’s editor.

Share
Posted in Uncategorized | Tagged

It’s interesting, but what is it good for?


This project was actually completed a few years ago, as the final project in my Experimental Drawing class. I combined techniques from our puzzle project and our juxaposition project, primarily because I wanted to see how easy it would be to make a tessellating pattern that could also interlock in 3D. (The image above is actually of some of the test pieces, not the final set, but you get the idea.)

I was also interested in exploring what would happen when I scrambled an image (traced onto the acrylic pieces), overlaid some bits of it with other bits, and then linked sets of pieces together to form partial cubes. Since all the pieces are the same shape, the partial cubes can be stacked, made into rows, etc., so you get some depth to the recombined image.

It wasn’t as successful as I had hoped (not that I really had any clear idea what it would be like), and I’ve often wished I still had access to a laser cutter, so that I could do more experimenting. I think it would be much more interesting if I had used much thicker lines on the acrylic, and chosen a pattern that would align better, so that the lines from the original image could link up with other lines that came from a different part of the image, creating an interesting new, fragmented/reassembled picture. It would certainly be easier with a pattern, rather than a picture.

If the pieces were larger – 12 inches on a side, or 2 feet – I could see them being used for shelving or end tables, although I’d want to make them from wood (probably), and work out a good way to keep the pieces together, because they slide apart /really/ easily, and that’s a Bad Thing for furniture. (I could just cut the slots slightly smaller, but then they might bind, especially if they were wood.)

Share